Mantua, New Jersey
Original Site:
September 2004
E-mail: usav8or@yahoo.com
The Radical Radial Fuselage.
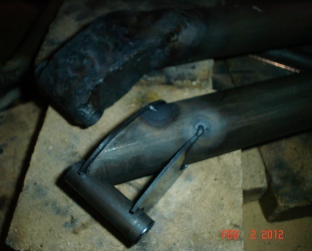
February 2, 2012 Change...
dimes, nickles, pennies ??
I can't tell ya how good it feels to be moving along with the biplane. At least I'm feeling that way at this point in the re-making of the main gear.
Spent two hours tonight tacking and welding on the sides and the strap for the second box fitting. lookin' good...
I'm just .2 hours shy of 1900 hours. Me's thinkin' I ain't gonna have this in the air flying in another 600 hours. Me's thinkin' at least another 1000 if not 1500 hours.
When I win the lottery I'll send the Jake out for an overhaul. Gotta play to win, right ? hmmm...
Oh yeah... here's a photo of the walls tacked to the second box fitting which is sitting next to the first, completed (er, third completed) box fitting. I'm liking the look of my welds again. They aren't looking like dimes stacked, more like an assortment of coins stacked. Heck... at least I'm consistant !!
February 5, 2012 Off topic ???
Time in the shop, not on the project.
Spent yesterday cleaning up both work shops... me and my usual work work work and leave the cleaning until some time later. Well, yesterday was "some time later." Actually did more than clean the saw dust and metal shaving up, I got most of my tools out and grouped them into "like" tools. Hope this cuts down on my "search for tools" time.
Even though I don't show any time spent on the project yesterday... mark me down for about six hours of time (for what it's worth.)
Tonight I welded up the second back box fitting. Same as the third one, just a little bit quicker. Need to let it cool down before reaming out the slag (from welding) with a 3/8" reamer. I'll do the other one at the same time. Then it's time to fit it up to the fuselage and see how it fits.
Hit another milestone tonight. Just passed the 1900 hour mark. Woo Hoo !!!
February 6, 2012 Seriously ??? Son of a beatch !!!
Reamed both box fttings and attached them to the fuselage. DAMN ! The bolt for the first one was a little difficult to put in, aka something is amiss. Got the bolt in and the tube is pushing the axle a bit (more than I would like.) YES !!! The beauty of doing it as I am this time is that I can make adjustments to it as I go along (if I need to).
A little heat to the tube, down near the fitting, a few pulls and she is looking mighty fine ! Attached the other box fitting to the fuselage and it's A-Okay.
Next on the aggenda was to weld up the two front fittings. Made sure they were in the right location, tacked and then welded. Need I say any more ?
Feels great having that plan of mine work as planned.
February 7, 2012 More than once...
Thought about going out to work on the biplane and said "naaaa... I'll give myself a break." Thought about giving myself a break and said "naaa... I'll work a little on the biplane."
Reamed both front fittings for the main landing gear. Lookin' purtee... Nice fit without having to heat and persuade either of the tubes into place.
Put the tubes back together to get my markings for cutting the cross tube. Made the marks, squared up the chop saw and made the cut. Spent the rest of the night working the pieces on the grinder to cut them back so that when I weld on the straps they won't be hitting each other. (just a heads up... mark where the cross tube connects with the tube going up to the axles so that you'll have a real good idea of where they should be... unlike me. not that it will be an issue, it just would have been a lot quicker the other way 'round)
Glad I thought about working on the biplane more than once tonight. Another one point three hours closer to flying this baby !!!
February 8, 2012 Cross tubes and coffee creamer
Just put on a pot of coffee... after putting in another 1.6 hours on the biplane. 10:08PM... an early night. Left work about two today. Started snowing and the Challenger isn't a 4x4 like my F-150 was. (better safe than off in a ditch somewhere) Got home, worked until a little after five and then it was my time. None of that getting home at 6:45 today.
Worked on the main gear cross tubes tonight. The first time I made the gear I cut the cross tubes at the same angle as the streamlined tube connecting to it. This made an odd looking point that I was going to live with. Well "luck" would have it that I needed to remake the gear and that gave me the opportunity to rectify that boo-boo... and thus my work tonight.
Lined up the pieces on the fuselage where they would go. Made sure they were level and square then made my marks for putting a nice curve to the end of one. Took them downstairs to the other work area and did a test run on a scrap piece of tubing. With a little tweaking it looked good to me. Did the same to the first cross tube, made a pattern from it and did some grinding to the second.
Took them out to the garage work area and did a test fit. Needed to make a small adjustment to one of the tubes with a wee bit more grinding. Did another test fit and Waa-freakin-Laa... they're ready for being tacked and then welded up.
hmmm... the coffee should be done by now... time to sit back and relax for a few minutes. Hey, I think I've discovered my favorite coffee creamer... International Delight Chocolate Caramel. Nice treat on a cold, snowy winter's night. By the way... is that pronounced care-a-mel or car-mal ???
February 10, 2012 You've got to ask yourself one question:
'Do you feel lucky?' Well, do ya punk?...
Worked on welding up two biguns tonight... aka, two heavy-walled tubes.
As the tube thickness goes up... so does your need for being patient. Gotta go back to the basics of pre-heating the area around the weld and then making sure that the puddle starts to form before you weld. The cross tubes are .o83 and the vertical tubes connecting to the cross tubes are .o95 (I think... didn't check the plans so don't quote me on this). There's a lot of metal to heat up there.
Only one thing I want to emphasis tonight... be patient with welding up heavy-walled tube. Rush things... and you'll have a bad weld which will lead to an eventual break which will lead to having to strip the paint from the gear to re-weld it, if you're lucky. (and yeah, I know it's a run on sentence) If you ain't lucky... who knows what will happen, eh ?
February 11, 2012 Three strikes and you're out...
but hit it after two...
and you're still batting 1000 !
Yeah, more work on the main landing gear... as opposed to the less than main landing gear ?
I keep thinking::
Ahhhh... the beauty of doing it like I am this second time. Needed to make a little tweak to both of the cross tube/vertical tube pieces. Heated up the cross tube, near the joint, and pulled a little to relax the "push" on the axle. Nice...
It took me some time to get to this point of being able to tweak it all along the way, but it's working out great now. Glad that I figured it out. The only way I got here was to keep on keepin'. Can't just stop and give up... may be stalled for awhile, but ya can't give up on it. If it ain't workin' the first, or maybe second time around, give it a third time around. It'll be a Grand Slam... gar-uhn-tee !!
February
12, 2012 Just one of a
few times...
I
wished I had gas.
Knew yesterday I would have this problem... low on O2. Never a good thing when welding with OA, is it ???
Figured I'd have something to do on Sunday, and, well, I did have a little something to do. I needed to tweak the fitting of the streamline tubes to the cross tubes. Rounding the cross tubes the other night made them about 1/2" shorter than when I originally fitted up the streamline tubes to them.
Fought with trying to peel off some duct tape I had along the bottom front edge of the first streamline tube I was going to fit up. (wanted to get it off, before I forgot to take it off, before heating up the tube to tack weld it.) Spent an inordinate amount of time trying to peel off about 12" of the stuff. (I had it on there marking the bottom/front of the tube to avoid confusion and cutting the wrong notch on the wrong end.) After what seemed like hours I said f' it and took the torch to it and burned it off (duh!)
Got things tacked and saw I still had enough O2 to do some
welding. Decided to weld up the top side (the bottom side
if you want to get technical) of the cross tube/streamline
tube weld. After doing my welds everything was still squared
up to the temporary axle jig (which I made up to see if there
was going to be any twisting and shouting going on). saaaa-weeet!!!
Tomorrow... off to pick up another tank of O2 before work
and then some mo' welding at night.
oh...
If you were wondering... the other time I wished I had gas...
Well, ya see, I was in the military, down in Fort Walton Beach, Florida... (ahhhh never mind)
February 13, 2012 Drum roll please...
The moment I've been pushing off... er, waiting for.
I tacked the streamline tubes to the axles (the last tubes to be tacked) and slid the tube supporting both axles from the one axle. Unbolted it from the fuselage and began to heat, heat, and add still more heat to the axle... finally getting it to the point of running a puddle. I think I need to go up to the next size tip for the welder; tip 205. The amount of pressure I need to push out the tip with the 203 is pretty hard. It sounds like an F-15 on takeoff.
I welded up 3/4 of the first tube. Still need to do the inside seam and then I'll be done with it. Should have that and all of the first streamline tube welded up tomorrow.
So far, so good... A few more days and I'll be able to test my theory of welding it in parts and then making corrections for it as I move along. Hope I don't have a lot of correcting to do on it.
When I was at Airgas today getting a new tank of O2, I picked up more 1/16" RG45 welding rod and a new pair of gloves for welding. Got a nice thick leather glove to keep the heat from buring my finger tips. Tried them out tonight. The heat doesn't get to them, but it's akward adjusting the flame and holding the rod. Maybe it's something I need to get use to, but at the moment I'm liking my old, thin set a lot better.
February 15, 2012 what to say ???
All this heavy tube welding... just plain sucks !!!
First off. It takes way too much time just heating it up.
Second off. The welds on the small angled intersections... look like crap-ol-la; good welds, just crappy looking. Probably the akward positioning of my weld rod hand.
'nuff said...
February 17, 2012 We're all judged...
one way or another.
All except the back attachment/tube has been welded up on the right gear. Time to try it out. A lot of heat tends to bend and twist tubing pretty good... as I saw the first time I did this.
Standing at the pearly gates... I threaded the 7/16" bolt into the fitting. I wasn't without sin... the axle lifted about 1/2" and move forward about the same amount. A little heat to the tubing around the front fitting... a few tugs forward and down and we were ready to enter through the gates.
Every step along the way I'm likin' my way of doing this the second time 'round; weld some, test it out... weld some, test it out...
Before finishing the right gear, by welding on the back fitting/tube, I decided to move on to the left gear to get that to the same point as the right. Hopefully I'll be without sin on this one !!! Doubt it... but there is always hope.
February 19, 2012 Perspective...
another way of understanding...
This thick walled tubing has been a pain in the arse... up until this point. Apparently I didn't have a full grasp on the situation.
Yeah, yeah, yeah... larger nozzle. Heat the area before welding. Run the puddle. I dunno... I'm not sure... but, it seemed a lot easier today welding up both of these weld lines. Hmmm... ??? Maybe the .o95 tubing is a little bit thinner than the axle's wall. Maybe I pre-heated it a bit more and didn't realize it. Maybe I turned up the O and A a bit more to make a hotter flame.
Maybe it was a combination of all of these things. But I'll tell you one thing... it looked like I knew what I was doing and I did it in short order; one of those ah-ha moments where the heaven's opened up and a choir of angels begin to sing.
Guess I wouldn't be sitting here writing this unless I was on the other side of learning at one point.
February 20, 2012 Thinking...
where would I be... ???
Recently I've been thinking... "I could have been here a year ago." I could have been here, just about completing the main landing gear and moving on. Probably would be near 500 hours closer to finishing her. hmmm... ???
Attached the forward portion of the left gear into the front fitting. A little heat and a few small tugs and it's back to where it's suppose to be. With both front portions of the main gear welded up, all I needed to do was tack and then weld the back tube/fitting to the forward part of the landing gear.
Tacked and near completed welding up the back to the front on the left gear. Ran into having a little bit more weld bead on the last inside corner I was welding. Not happy with it so instead of waiting for it to cool and finishing it up, I decided to call it a night and I'll do that last bit of filing/welding tomorrow before starting on the second, and final mating of front to back.
It's worth repeating... I'm real happy with how the weld some, test fit, weld some, test fit process is going. I'm never too far into the part where I can't make the adjustment to bring it back to where it needs to be. Other than learning how to TIG weld, I can't think of a better way to do this.
still thinking... "I could have been here a year ago." hmmm... ??? Probably just wasn't ready to move on; needing that space of 500 additional hours ahead of me... (Seriously ?)
February 21 and 22, 2012 Ever try to push a puddle...
up hill... ???
Other than having to weld upsided-down last night and tonight... no news flashes.
The tapping of the weld rod at that upsided-down angle isn't too natural... tends to get a little excessive with the weld filler. There was a certain point I just needed to stop the weld, take it off the fuselage (yeah... keeping it on the fuselage as long as possible helps in keeping things in the right spot) so that I can turn the gear right-side up and finish the "point" of the weld where the two side welds come together.
Welding around the axles has been trying, to say the least. Not something that can't be overcome... with a little twisting I proved that last time.
I like the sound of this...
I'm real close to having this gear welded up. All I need to do is check the left gear for proper location and then weld on the straps and the brake backing plates. And then it's... time to make some airplane noises.
February 23, 2012
(sh)It happens...
First thing on the agenda tonight was to check both gear for movement. They both moved a smiggen; fractions of an inch. Twernt something that I needed to get worked up about. I'm more than happy with the way I've kept things in "check" this time.
Next thing I needed to do was spend some time grinding away part of the right axle. Not much to write on that subject...
Speaking of mundane tasks... don't become lacks on any part of the build. It may be as simple as my task of grinding off the back-end of the axle then grinding it down smooth. Stay focused !!!
Shit happens... and when it does, it happens fast.
February
25, 2012 brains need not
apply...
I usually find myself keeping busy, or messing around, or
doing something-or-other, on Saturday. The day seems to slip
by without me doing a damn thing on the biplane. Not today...
Today, point
eight hours... not much, but it's sumthin'. Time enough to
grind the back end off the 2nd axle and then grind it down
so that tomorrow I can start welding on the straps (which
reminds me... I need to find that 6th strap).
As with most things on the making of the biplane, I learn
a lot on the first of two, or first of three, or first of
(insert number)... The second one no need to figure it out.
No need to wonder if I'm doing it the right way. No need to
do nuthin' but repeat what I did on the first piece.
A bit of advice
for when you're griding, with a hand held grinder (or I guess
any other type of grinder)... to cut pieces out, or off, a
tube. If you try cutting the tube with the grinder only having
the width of the grinder as the cut, it's going to want to
kick back on you once you've cut through the tube and the
blade of the grinder catches on the tube.
You could brake a thumb or sprain your wrist when it happens.
The tool could do worse... it could cut into some of the other
tubing that you're cutting around. What I do is kinda dig
out the area (if you're able to do this) so that the width
of the cut is two to three times the width of the cutting
tool.
Like everything here, it's just a suggestion, I'm not telling
anyone to do anything... it's something that I've found that
works for me.
February 26, 2012 Changing things up... because I can
Welded up the first of six straps; the first of two of the more difficult (axle straps).
Actually, taking that a bit further... nothing is difficult if you understand what you are dealing with. In this case, thick ! walled axles. I took the time to pre-heat the parts instead of fighting the "cool" weld puddle which tends to bite and hold onto the end of weld rods.
I bided my time in the beginning tonight... and didn't need to have a wrestling match with the puddle for the rest of the evening.
I did something a little different this time. Instead of adding on additional pieces to feather the ends of the streamline tube into the axle I heated the ends up and tapped them down to fair them into the axles. I like the look a lot better and it's less weight (only by an ounce or two, but it all adds up in the end).
February 28, 2012 Ditto...
Other than taking a little bit longer than the first one I welded up... can I say "Read what I did on February 26th." ??
Hmmm.... looks like I already did.
February 29, 2012 Ya always end up with extra rolls...
yeah... More work on the landing gear, as if I thought that I would be working on something different tonight.
Attached both gear legs to the fuselage. Needed to check to make sure that they were still in their correct locations by dropping plumb bobs. They are A-okay...
Moved on to working on the next strap... Wasn't happy with the shape of the ends where the cross-tubes meet the streamline tube. Ground the one down then tacked on the strap. Got about half-way through welding on the strap... got to the point where I need to let it cool down so that I can grind some of that excess strap away (unlike last time when I kinda did all kinds of freaky stuff to it. A funk I was going to live with.)
No funk... this time!!
Anyhow... checked the time and it was getting late. Decided to break for the night and grind that excess away tomorrow when it's good and cool. Hope that the acetylene lasts. I'm below 200 pounds of pressure. Generally when it gets real low I'm unable to get a good puddle going.
A thought just occurred to me... The relationship between acetylene and oxygen tanks, when welding, are kinda like the relationship between hotdogs and hotdog rolls... they just never run out at the same time.
March 2, 2012 I got a little bit of gas today...
The beauty of working from home... start early in the morning so that I can break for a half hour to make a run for some of that A in O and A welding. Picked up a sleeve of 1/16th and 3/32nd weld rod too.
Looks like I'm back in business without really being out of business.


 Oh yeah... here's a photo of the walls tacked to the second box fitting which is sitting next to the first, completed (er, third completed) box fitting. I'm liking the look of my welds again. They aren't looking like dimes stacked, more like an assortment of coins stacked. Heck... at least I'm consistant !!
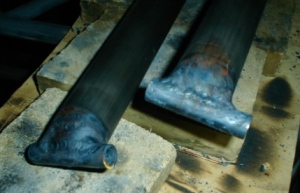 Next on the aggenda was to weld up the two front fittings. Made sure they were in the right location, tacked and then welded. Need I say any more ?
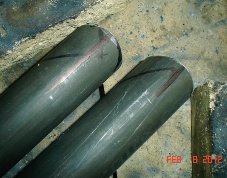 Lined up the pieces on the fuselage where they would go. Made sure they were level and square then made my marks for putting a nice curve to the end of one. Took them downstairs to the other work area and did a test run on a scrap piece of tubing. With a little tweaking it looked good to me. Did the same to the first cross tube, made a pattern from it and did some grinding to the second.
 As the tube thickness goes up... so does your need for being patient. Gotta go back to the basics of pre-heating the area around the weld and then making sure that the puddle starts to form before you weld. The cross tubes are .o83 and the vertical tubes connecting to the cross tubes are .o95 (I think... didn't check the plans so don't quote me on this). There's a lot of metal to heat up there.
 Standing at the pearly gates... I threaded the 7/16" bolt into the fitting. I wasn't without sin... the axle lifted about 1/2" and move forward about the same amount. A little heat to the tubing around the front fitting... a few tugs forward and down and we were ready to enter through the gates.
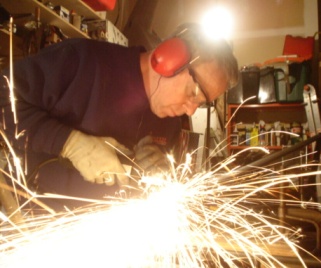 Today, point
eight hours... not much, but it's sumthin'. Time enough to
grind the back end off the 2nd axle and then grind it down
so that tomorrow I can start welding on the straps (which
reminds me... I need to find that 6th strap).
Today, point
eight hours... not much, but it's sumthin'. Time enough to
grind the back end off the 2nd axle and then grind it down
so that tomorrow I can start welding on the straps (which
reminds me... I need to find that 6th strap).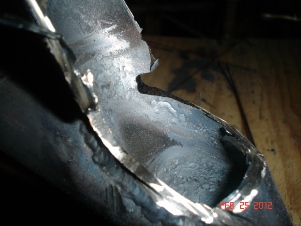 A bit of advice
for when you're griding, with a hand held grinder (or I guess
any other type of grinder)... to cut pieces out, or off, a
tube. If you try cutting the tube with the grinder only having
the width of the grinder as the cut, it's going to want to
kick back on you once you've cut through the tube and the
blade of the grinder catches on the tube.
A bit of advice
for when you're griding, with a hand held grinder (or I guess
any other type of grinder)... to cut pieces out, or off, a
tube. If you try cutting the tube with the grinder only having
the width of the grinder as the cut, it's going to want to
kick back on you once you've cut through the tube and the
blade of the grinder catches on the tube.
 A thought just occurred to me... The relationship between acetylene and oxygen tanks, when welding, are kinda like the relationship between hotdogs and hotdog rolls... they just never run out at the same time.