Mantua, New Jersey
Original Site:
September 2004
E-mail: usav8or@yahoo.com
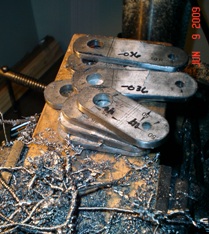
June 9, 2009 More work... still peeling Oranges ?
More
time spent on getting these small, tiny, little, fittings
ready for the biplane. A lot of work... unbelieveable the
amount of time. Another 3.1 hours spent on them tonight.
Finished up the sanding of the edges and was able to fit
in drilling of all 1/4" and 1/2" holes... in all eight.
Made sure of that.
To speed things up, I'd take them to the belt or disc sander...
been there before. Unless I knock off that very rough edge
with the file, I end up breaking the sanding belt. The sharp
edge of the fitting cuts right through the belt. The majority
of the time is getting that rough edge off. Another 10 minutes
of hand sanding and it's finished.
And for the additional 10 minutes... well worth the time
for a nice looking fitting. Just wished I had a way of cutting
all that other time off with a way to cut that rough edge
off. Still plenty of them to do so I still have plenty of
time to think about it. Not that I will.
This filing and sanding of fittings isn't that glamorous
of a job. Something that needs to be done though. Gives
one time to think... ponder over current events... or to
just veg out listening to Koob
spin a few disc's of Rock and Roll on MGK.
June 1, 2009 If it weren't for the fact that I can say
I made these... I would have bought these
fittings.
A lot of elbo grease and time went into making these very
small, size and quantity, fittings. Spent another 4.6 hours
today on them. Another ??? A quick adding of the numbers
and I've put in over 12 hours on these eight very small
fittings. Like I said... I can say that I made them. 'nuff
said.
The first thing I did today was to bend them to their proper
shape. The shorter of the two fittings have a 13 degree
bend which I thought would be a bear to bend. Turned out
to be realatively easy. The second fitting... bent two degrees.
A breeze after wacking the first small fitting to it's proper
shape.
Here
they are in all their glory. Not as pretty as some... the
.190 4130 is hot rolled. Thus... it has a very orange
peel looking surface. What you see is the result of me first
filing down the really high spots then sanding with 80 grit...
then 100 grit... then 180 grit sand paper. You would expect
some highly polished works of art.
June 15, 2009 Sometimes the better we get at something... the longer it takes to
do it.
I've been working on the tail wheel fittings for a few days...
yeah I know, there are only two... and it's taking me a
few days. Yep... a few days to make the Tail Wheel Retainer
and Mounting Plate.
Never planned it to take this long. I figured I'd breeze
right through it will all this knowledge I had on making
fittings. Apparently... not so. And so goes the learning.
Let's see, I made three Tail Wheel Retainers before I got
to the point of welding on the mounting tubes. And I made
five Tail Wheel Mounting Plates.
The problem with the first Tail Wheel Retainer started before
I made the first cut in the 4130. I drew up the drawing
wrong. It was too long and too narrow. Wonder how I screwed
that all up... it's beyond me. OK... with the drawing fixed
and printed out I glued, cut, ground down, filed, sanded
and whacked into shape the second one. Looks like when I
whacked it... I wasn't looking at the site line on the level
and after whacking it, I saw that the opening was a little
too wide; a 1/16th to be exact. So... back to printing out
another drawing, glueing it on the 4130, cutting, grinding,
filing, sanding and giving it another few whacks, after
making sure I was looking at the site line... on line. Now
that the retainer has been bent (correctly,) all I need
to do is weld on the tubes.
Oh yeah... can't just pull those two, 3/4" long 3/8" x .o65
tubes that have been reamed to 1/4" out of a plastic bag
that has been nicely marked, I need to cut a few pieces
of 3/8" x .o65 a little longer than 3/4", square them up
in the lathe to 3/4" then ream them with a 1/4" reamer.
NOW they're ready to be welded onto the retainer.
Before
welding the tubes onto the retianer I need to make sure
that they will match up to the holes on the Tail Wheel Mounting
Plate. To do this I need to make the Mounting Plate so that
I could make a jig from it. In order to bend the .100 piece
of flat stock I knew that I would need to leave the one
end a little longer than what the plans call for and then
trim it to size. Well... I did that and it didn't work.
I only left it a little long at the center of the fitting,
as you can see in the photo. Problem is, when I whacked
it with the dead-blow hammer, it bent it over pretty easy
but the outer ends twisted. OK... that's the first one...
so why did I need to make another four before I had the
one Tail Wheel Mounting Plate I needed, you ask ?
The second one I made out of .100 thick
material like the first (the plans call out for .o95
material but it's not produced any more) when I wacked
it around the 1/8" bending block it wasn't close to making
that bend like it was suppose to do. Matter of fact, when
I looked at that first one I bent, the one with the twists,
it wasn't close to it either. Hmmmmm....
OK... corporate decision here. I'm going to go with a little
bit thinner material, which everyone says not to. And I'm
not telling you to do that. I just can't see making the
fitting like they say unless I cut two separate pieces and
welded them up at a 90 degree angle. So... .o90 material
it is.
Grabbed the sheet of .o90, glued on the drawing, cut, ground,
filed and sanded the ends on this one before bending it,
leaving the extra long end on the one side un-touched. Took
it over to the drill press and drilled (2) quarter inch
holes in it then clamped the fitting in the vice, with the
bending block sandwhich, and whacked it into shape. And
into shape it was whacked. Nice bend to it. All I need to
do is cut the shape on the one side, grind it, file it,
and sand it, and it'll be ready to attach to the Skybolt.
Thing is... when I cut one of the sides I cut in past the
line with a little bit of a bow to it (I won't go into why
or how I made that cut like I did... but I made the cut
like I wanted to but when I peeled the paper away it wasn't
in the spot that it needed to be. follow ? didn't think
so)
Yeah yeah yeah... I could have skooched the line in a little
bit further and mirrored it on the other side without anyone
knowing the better... except me. So, back to glueing, cutting,
grinding, filing, sanding, drilling and whacking, again.
How
many is that I've made now ?... I even forget. Maybe it
was only four, not five. I've made enough to make one good
one of each, the Retainer and the Moutning Plate.
I'm not done yet. To make the simple jig positioning the
tubes on either side of the U-shaped Retainer, I took a
piece of MDF and match-drilled the Mounting Plate holes
into it. Inserted (2) 1/4" bolts up through the bottom of
the MDF and slid the two 3/4" tubes onto them, clamped the
U-shaped Retainer in position between the two and welded
it up. Now I'm finished.
Just over eight hours of time put into making these two
fittings. If I were a kit builder, all I would need to do
is pull them out of the box and bolt them onto the plane.
Now, what fun would that be ?
Yeah... more to come
June 16, 2009 Close... but
no cigar.
Four and a half hours today... spent making both Elevator
Horns. Purty looking things... until I hammered the bends
in them. The first one I whacked... turned out great !...
the second one... another story. ALL that time spent...
looking beautiful... up until those last few whacks with
the dead-blow. DAMN !
The bitch of it... another one of those fittings that were
speced as .o95, but since it isn't produced any more, it
should be cut from the next size up material, .100, for
the strength. This stuff just doesn't want to bend to the
1/8" radius. I'll clamp it in it's bending block sandwhich...
lock it into the vice and hammer away at it. No matter what
pressure I put on it, in that vice, it moves ! unbelievable
!
Solution...
There is a modification in the Skybolt Builder's Manual
to strength this area by inserting an aluminum block between
the two horns. I think I'll make them out of .o90 and use
that modification to stiffen it up a bit.
Still have a problem. The teeth on the lasts bandsaw blade
I have have been eaten away and the new ones aren't here
yet. I need to order some additional .o90 material. What
to do... what to do... ? Plenty.
Bad Horns... above.
AM thoughts...
Come to think of it, one of the reasons I had such a large
difference between the two horns, and their bends, is because
I didn't have the bend allowance and sight line figured
out before I glued down the drawing. I hand drew these with
an ink pen after the fact. The pen wasn't cooperating, the
lines were thick, when they showed up at all. A little off
here, and it would show up big later on... as I saw.
DAMN pen... see I knew it wasn't me.
June 18, 2009
Finally... lighting
up that cigar.
Looked over the plans today to see what could be done while
I waited for those packages from the Cyber Workshop and
Aircraft Spruce to arrive... the bandsaw blades and the
material I needed to get these Elevator Horns made... for
the second time.
Saw that I need four heads for the two Idler Arms and thought
that I only made two. That's a start to the day at least.
Walked into the workshop, over to the bandsaw... for some
reason. Hmmmm.... what's that, behind the drill press ?
Looks like a bandsaw blade. Thought that I had thrown out
all those toothless ones last week... wishing I hadn't,
thinking that I could "hack" my way through a few pieces
of 4130 flatstock while waiting for the new blades. Lucky
find ? Maybe there are enough teeth on it that I could,
just maybe, cut a few fittings out with it. Pretty sad,
isn't it ?
Picked it up and started running it through my fingers looking
for those spots with the missing teeth. I think I spun it
through my figers full-circle twice before I realized that
here sat a virgin bandsaw blade. Thanks You ! Thankyou..
Thankyou.. Thankyou... Thankyou... Thank you God of the
Tool World ! Just moments before I almost resigned
myself to taking the 45 minute drive, each way, to pick
up another blade from Harbor Freight... down in Vineland.
I'm in that Elevator Horn state of mind... when you get
so immersed into something that wrapping you're mind around
something else, before completing the current project, throws
you in all kinds of fits. Best if left alone. OK... I still
have some of that, actually quite a bit of that .100 material
sitting in my 4130 stack... why not attempt another set
of those horns ?
A close
repeat to yesterday... today. Printed out the drawings for
the Elevator Horns all the way through to sanding the edges
with 180 grit. This time though, before attempting another
whack at those horns, I practiced on a few scraps of .100
flatstock. Glued a print of the Elevator Horn onto it, lined
it up and gently persuaded it with the three pound dead-blow.
Worked like a charm this time. I seemed to remember that
it happened like this last time. Good for the first attempt...
poor for round two. Will I bat a thousand or the 500 that
I did yesterday ? I'm feeling lucky, and I had those site
lines already printed on the drawings so I was feeling pretty
confident too.
One whack... two whacks... three four five six whacks !
I'm close. Seven eight nine... ten whacks ! Held the square
up to it and it was damn close. Whack twelve did it for
it. That's one. A repeat for the second. Now for the real
test... how does it compare to the other Elevator Horn that
I just finished whacking ? You tell me. Do those two Elevator
Horns in the above photo look damn close, or what ?
Didn't end up making them out of .o90 like I thought I would.
Feels good to conquer that .100 material. Now, where's that
cigar ?
Oh yeah... those four heads for the Idler Arms... they were
already made.
PM thoughts...
Ya know... I'm thinking back on all of this. This stuff
is pretty, kinda, I think it is, new. I'm bending thick
pieces of metal that need to look just like another thick
piece of metal I bent. Unless you're dead on, you're dead
off.
I'm going to retract my June 15th statement (Sometimes
the better we get at something...the longer it takes to
do it) based on this epiphany. Also, I'm pretty critical
of my work... no matter how much or how little I know. I'm
always comparing my work to other, more knowledgeable builders,
so I'm pretty confident my stuff is being made right.


 More
time spent on getting these small, tiny, little, fittings
ready for the biplane. A lot of work... unbelieveable the
amount of time. Another 3.1 hours spent on them tonight.
Finished up the sanding of the edges and was able to fit
in drilling of all 1/4" and 1/2" holes... in all eight.
Made sure of that.
More
time spent on getting these small, tiny, little, fittings
ready for the biplane. A lot of work... unbelieveable the
amount of time. Another 3.1 hours spent on them tonight.
Finished up the sanding of the edges and was able to fit
in drilling of all 1/4" and 1/2" holes... in all eight.
Made sure of that. 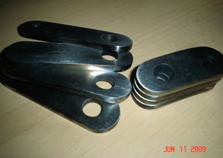 Here
they are in all their glory. Not as pretty as some... the
.190 4130 is hot rolled. Thus... it has a very orange
peel looking surface. What you see is the result of me first
filing down the really high spots then sanding with 80 grit...
then 100 grit... then 180 grit sand paper. You would expect
some highly polished works of art.
Here
they are in all their glory. Not as pretty as some... the
.190 4130 is hot rolled. Thus... it has a very orange
peel looking surface. What you see is the result of me first
filing down the really high spots then sanding with 80 grit...
then 100 grit... then 180 grit sand paper. You would expect
some highly polished works of art.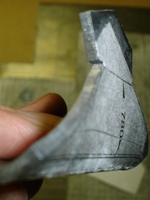 Before
welding the tubes onto the retianer I need to make sure
that they will match up to the holes on the Tail Wheel Mounting
Plate. To do this I need to make the Mounting Plate so that
I could make a jig from it. In order to bend the .100 piece
of flat stock I knew that I would need to leave the one
end a little longer than what the plans call for and then
trim it to size. Well... I did that and it didn't work.
I only left it a little long at the center of the fitting,
as you can see in the photo. Problem is, when I whacked
it with the dead-blow hammer, it bent it over pretty easy
but the outer ends twisted. OK... that's the first one...
so why did I need to make another four before I had the
one Tail Wheel Mounting Plate I needed, you ask ?
Before
welding the tubes onto the retianer I need to make sure
that they will match up to the holes on the Tail Wheel Mounting
Plate. To do this I need to make the Mounting Plate so that
I could make a jig from it. In order to bend the .100 piece
of flat stock I knew that I would need to leave the one
end a little longer than what the plans call for and then
trim it to size. Well... I did that and it didn't work.
I only left it a little long at the center of the fitting,
as you can see in the photo. Problem is, when I whacked
it with the dead-blow hammer, it bent it over pretty easy
but the outer ends twisted. OK... that's the first one...
so why did I need to make another four before I had the
one Tail Wheel Mounting Plate I needed, you ask ? 
 How
many is that I've made now ?... I even forget. Maybe it
was only four, not five. I've made enough to make one good
one of each, the Retainer and the Moutning Plate.
How
many is that I've made now ?... I even forget. Maybe it
was only four, not five. I've made enough to make one good
one of each, the Retainer and the Moutning Plate.
 A close
repeat to yesterday... today. Printed out the drawings for
the Elevator Horns all the way through to sanding the edges
with 180 grit. This time though, before attempting another
whack at those horns, I practiced on a few scraps of .100
flatstock. Glued a print of the Elevator Horn onto it, lined
it up and gently persuaded it with the three pound dead-blow.
Worked like a charm this time. I seemed to remember that
it happened like this last time. Good for the first attempt...
poor for round two. Will I bat a thousand or the 500 that
I did yesterday ? I'm feeling lucky, and I had those site
lines already printed on the drawings so I was feeling pretty
confident too.
A close
repeat to yesterday... today. Printed out the drawings for
the Elevator Horns all the way through to sanding the edges
with 180 grit. This time though, before attempting another
whack at those horns, I practiced on a few scraps of .100
flatstock. Glued a print of the Elevator Horn onto it, lined
it up and gently persuaded it with the three pound dead-blow.
Worked like a charm this time. I seemed to remember that
it happened like this last time. Good for the first attempt...
poor for round two. Will I bat a thousand or the 500 that
I did yesterday ? I'm feeling lucky, and I had those site
lines already printed on the drawings so I was feeling pretty
confident too.