Mantua, New Jersey
Original Site:
September 2004
E-mail: usav8or@yahoo.com
June 19, 2009 Not Idle... Idler
Arms ?
Thought that I had these already made... I did. Seems they
were the wrong ones. They were for the Standard Skybolt.
Made these when I wasn't so diligent about comparing the
Standard Skybolt drawings to the Radial supplement.
That's all changed... as you can see, er read.
I wanted to finish these Idler Arms today.
Mark them off the list. Marked my start time, walked downstairs
to the workshop, picked up the Standard and the R drawings
to compare the two and saw the difference. What I'll call
the head on the pieces... the Standard's is larger with
different hole spacing and a thinner 4130 than the R Version.
We're talking R Version here so you'll want the head that
is 2" wide, 1" spacing between the two .25" holes and .o90
thick. Got it ? Good.
Remember to match drill two sets of heads so you're not
throwing a fit when you go to line these up together and
find that the holes don't match.
Crafted all four today, so now I can make the jig for them...
the one to keep them in position when I weld.
Nothing new learned today, other than benefitting from my
previous learning of doing "Do diligence" in comparing the
Standard and the R supplement drawings. Thank God for learning
!
June 20, 2009 Keeping busy... with the Idle-r
Arms.
More work on the Idler Arms. Spent a little bit of time deciding on what size tube to use.
Should have just went with the ones that Curtis drew up on the R supplement, 'cause that's the one that I ended up with. I was trying to figure out what, or how, it would be connect to the fuselage using his tube. The Standard's drawings gave a pretty detailed drawing of what to use, and how to attach it to the fuselage. I figured out I'd make it similar, but using his 5/8" x .o58 tube I'll be inserting a 1/2" bolt to lock them into place. Looks like the Standard uses a tube slipped inside the 7/8" they spec'ed.
Once I decided on the tube... it was steady progress the rest of the day. Although... it didn't seem like I accomplished a whole lot.
Cut the tubes to length for the Idler Arms; notched the one to accept the pivot tube and then squared off the pivot tubes in the lathe. Needed to make a few jigs to hold all the pieces in place. Made one specifically to tack the pivot tube onto the upright tube. If I had only used the one jig... 1. I would have burn away most of it just tacking on the pivot tubes... and 2. I had the pivot tubes cut to their 1" length and that didn't leave much to be stuck into the jig for positioning with the .o90 shim I used under the upright tube to make it even with the front where the .o90 heads are. Worked out great. Made a lot of smoke too. The only thing left to do is put the finish welds on them.
A lot of running up and down steps today. Neither of the workshops were set up to be doing either of the tasks I carried out today. Suffered through the wasted time of forgeting things and needing to go search for them. Can't complain... I have space for two small workshops. Life is good.
July 16, 2009 Home work... as opposed to away from home work.
I'm focused on getting the Main Landing Gear finished, but it's 20 miles away. So what to do when it 20 miles away and I want to keep busy ? ....plenty !
A multitude of fittings need to be made, not pulled out of a box, for the fuselage, wings, empennage... You get the picture. Since I'm working on the fuselage, I thought I'd keep my thoughts wrapped around something similar. And that similar is the Strut Attach fittings. These puppies are crafted from the finest .125 4130 material. Some pretty heavy duty stuff.
As you can see from the photos, I've been cutting, grinding, sanding and bending quite a bit over the past few days. Felt good to put the bend in them tonight.
The four pieces in the upper left-hand corner of the first photo will be bent, then cut to size and match drilled with their corresponding fittings; the bottom two in the stack with the "V" shapped fittings and the top two with the other two fittings. They fit up with the other pieces without much explanation as to where the bends need to go on these four. The plans give the bend, but not the location. Easy enough to cut them over-sized, bend, put them up against the other fittings, trace, cut... etc. I'm not going to wrack my brains trying to figure out something that can more easily be done the way I'm doing it. I'll make a note for others after I've got them made.
That's it for tonight.
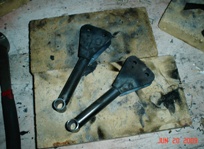
July 21, 2009 Banging out... er, into shape... a few fittings
Another shot of one of the paired fittings that I whacked to the correct shape the other day. Just realized I had it in my camera. Thought I'd post it here. For some reason there was a green hue to the image. After re-working the image, the best I could do was make it black and white. Kinda retro. Anywho... Here's one of the one's I banged into shape.
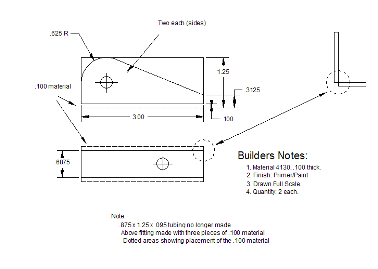
August 8, 2009 Things ya just can't buy anymore... make for a good project.
It's a little bit more work than the original builder had to do... but it's either make it for a few pennies in material or pay $50.00 for it. Hmmm... a little bit of learning and a little bit of money saved... a no brainer.
Case in point, the Rear Flying Wire fittings. On the plans they say to make it out of .75" x 1.25" x .095 retangular 4130 tubing. Hmmmm... checked with Aircraft Spruce, Wicks, Wag-Aero, Airparts Inc; nope, none of them carry it. Nothing even close. OK... I'll lay this out on CAD and bend one up out of .100 4130. An hour and a half later I realized that this isn't going to work either. With the bend radius there isn't enough flat area on the bottom of the fitting to allow a bolt to be used (now I see why they said to make it out of retangular tubing.)
Hey, maybe cut the sides and the bottom out of .100 material and weld it together to form the shape ? Sounded like a good idea to me. Threw it out to the guys on the biplane forum. Waited a day and didn't get a response... so, I headed over to Whitey's Airport and explain the situation to him. He said... not a problem to make it in three pieces. Thing is, make sure that you have a lot of the edge, on the peices that you are welding together, exposed.
Here's what he was talking about:
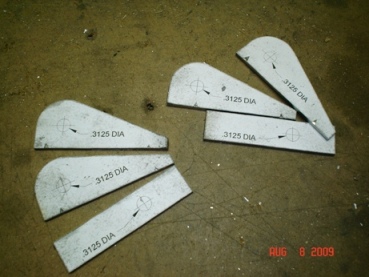
A little over one point five hours later and I had the piece drawn out on CAD and all the pieces cut to shape. Just need to file/sand smooth, weld together and drill the holes. saaaa-weet !
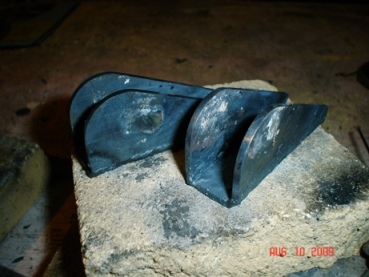
August 10, 2009 A little bit more than minimum wage... and I have a set of Rear Flying Wire fittings.
A little over four hours on it today. Yep... a little over four hours and a some of that was learning.
I wasn't happy with how the first fitting welded up. That under-cut wasn't playing nice. So, for the second fitting, I ran a weld puddle down the length of each side... fusing the sides together, then I went back over it with a weld line. Re-did the first one after I cut back the weld to where it was practically like it was before I welded it up. Now, I'm happy with both fittings. And here is the finished product (other than the holes in the up-rights and cleaning them up.)
Let's see... $50.00, plus shipping (round it out to $60.00) divided by 5.8 hours. Hmmm... less than minimum wage. But, oh... the learning I gained... priceless.
STOP THE PRESSES...
Posted my results on the biplane fourm and the general consensus was to not use a fitting that has been welded, for this particular fitting. And in doing my "The day after" inspection of the part, I see where the weld didn't penetrate the inside edge of the fitting... there isn't any scaling. Not a good sign. They look nice, but I wouldn't use them like they are.
I'll be calling Steen to see how their's are made. I'm not about to spend hours on making these small fittings work. Plenty of other things to be done. I'll just pay the price and get them from Steen and move on with the project.
JimW will be bending his from a piece of flat stock, making a custom washer to allow the head of the bolt to sit square with the bottom of the fitting. For me... to make that custom washer seat perfectly isn't going to work. And if I start the project... I'll work on it until it is right. And you know where I went with that by making those Brake Backing Plates.
Now... if I had a mill. I'd do like Scottly and John B, on the biplane forum, did... mill them from a solid chunk of metal. Nice...


 Should have just went with the ones that Curtis drew up on the R supplement, 'cause that's the one that I ended up with. I was trying to figure out what, or how, it would be connect to the fuselage using his tube. The Standard's drawings gave a pretty detailed drawing of what to use, and how to attach it to the fuselage. I figured out I'd make it similar, but using his 5/8" x .o58 tube I'll be inserting a 1/2" bolt to lock them into place. Looks like the Standard uses a tube slipped inside the 7/8" they spec'ed.
 A lot of running up and down steps today. Neither of the workshops were set up to be doing either of the tasks I carried out today. Suffered through the wasted time of forgeting things and needing to go search for them. Can't complain... I have space for two small workshops. Life is good.
 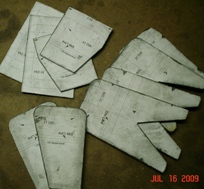 A multitude of fittings need to be made, not pulled out of a box, for the fuselage, wings, empennage... You get the picture. Since I'm working on the fuselage, I thought I'd keep my thoughts wrapped around something similar. And that similar is the Strut Attach fittings. These puppies are crafted from the finest .125 4130 material. Some pretty heavy duty stuff.
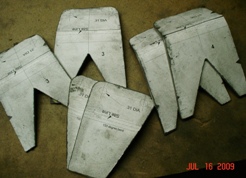 The four pieces in the upper left-hand corner of the first photo will be bent, then cut to size and match drilled with their corresponding fittings; the bottom two in the stack with the "V" shapped fittings and the top two with the other two fittings. They fit up with the other pieces without much explanation as to where the bends need to go on these four. The plans give the bend, but not the location. Easy enough to cut them over-sized, bend, put them up against the other fittings, trace, cut... etc. I'm not going to wrack my brains trying to figure out something that can more easily be done the way I'm doing it. I'll make a note for others after I've got them made.
 Another shot of one of the paired fittings that I whacked to the correct shape the other day. Just realized I had it in my camera. Thought I'd post it here. For some reason there was a green hue to the image. After re-working the image, the best I could do was make it black and white. Kinda retro. Anywho... Here's one of the one's I banged into shape.