Mantua, New Jersey
Original Site:
September 2004
E-mail: usav8or@yahoo.com
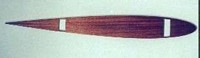
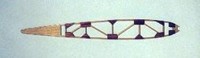
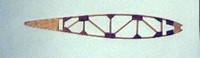
Completed Ribs
Here are pictures of all the ribs that go into the building of the Skybolt wings, both upper and lower.
The ribs on the left are the Lower Wing Ribs and the ribs on the right are the Upper Wing Ribs. For those of you building a
Skybolt, I list the station and total number of ribs needed for each type of rib. Comprende ?
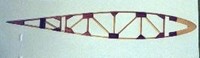
Lower Wing
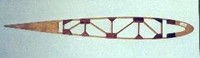
Upper Wing
Stations 2 1/4. Qty: 2
Picture To Come
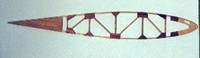
New 3-pc Wing Needs a different Butt Rib than the traditional 1-pc wing.
Stations 13 1/4, 24 1/4, 35 1/4, 46 1/4. Qty: 8
Stations 24, 35, 46, 57, 68. Qty: 10
Station 57 1/4. Qty: 2
Station 79. Qty: 2
Stations 68 1/4, 79 1/4, 90 1/4, 101 1/4 Qty: 8
Stations 90, 101, 112, 123. Qty: 8
Station 112 1/4. Qty: 2
Station 134. Qty: 2
A note about the blueprints... over time they shrink. Or, if you've decided to make copies of it to use as the ribs template, they could have
shrunk OR increased in size.It's not that critical that you re-draw the full size main wing ribs if
they are a little smaller/larger than what they call out for. BUT, when you go to make the tip ribs... Make sure that the space between the spars is the same
distance. Don't ask me how I know this.
A little side note. From talking with a few of the builders on the biplane forum I've come to understand that NO TWO Skybolts, or any other
homebuilt, are built exactly alike. The important thing is to make sure that you not only build close to the plans, but also, and this is critical, make sure that Part A mates up to Part B,
Part B to Part C, etc. Just make sure that eveything on YOUR biplane fits up to the part that it needs to attach to.
Ribs ribs ribs ribs.... I just can't get away
from these things. Ya think you're just about done with them
then the guys on the biplane forum have a discussion about the
"drumming" effect of the fabric on the wings in the prop-wash
area on the higher horsepowered Skybolts. Me, with at least
360 hp qualifies for the change/addition that they suggest.
One of several "fixes" can be done to prevent this "drumming."
1. Build the wings per the plans and cover the area with two layers of cloth. Not as
easy as it sounds, I'm told.
2. Add extra ribs and locate them inboard/outboard enough to miss the drag wires. Not evenly
spaced so it may not look very nice.
3. Build the ribs and move the verticals capstrips in the drag wire areas to allow clearance.
This will require that you add additional vertical capstrips in another area to help support the upper and lower
capstrips on the ribs.
4. Add extra ribs evenly spaced, cut out the
capstrip that interferes with the drag wires then add capstrip pieces where needed. Not
a pretty site if you're looking at the uncovered wing, unless you are VERY careful with
making the changes to the ribs.
5. Add extra evenly spaced ribs but, when
building the ribs figure out which capstrip will need to be modified and replace them in the
rib jig with 1/4"x1/2" or 3/4" wide capstrip. This allows wood removal clearance
for the drag wires and looks much better, like you actually planned ahead for this problem.
I've decided to build the ribs and work them into the wing as suggested in numro five above. Just think, if I hadn't waited all these
years to complete the 'bolt, I'd have drumming of the wing fabric with all kinds of cracking problems. Glad I waited : )
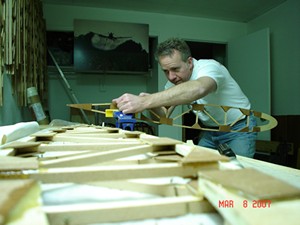
Trimming the ribs
I've started trimming the overhanging gussets and excess glue off of the ribs. I was at first going to make a jig that I could place each of the ribs
into and then route them to size/shape. After thinking about that for awhile, all of about 2 minutes, I just couldn't put a router with a blade moving at
upwards of 3000 rpm against these ribs that I've been working so long and hard on. One slip and there goes all that work. I'd rather spend a few hours
hand trimming them using a few different kinds of files. It's actually going along a lot faster than I thought it would.
I started off using a wood plane, the kind that shaves wood, not the flying type, but I found that, although it did a nice job, it just wasn't getting the job done in a reasonable amount of time.
"What to do ?" Ahhhh... a wood file might be the ticket. Took the wood file from it's resting place in the tool box and began to lightly brush the surface of the capstrip where there was an excess of glue.
Worked beautiful. Moving up the length of the rib I happily removed the glue from the side of the capstrip.
It wasn't too long before I got to an area where a few of the gussets were overhanging the capstrip by about a 1/4 inch with
a good amount of glue underneath. The wood file worked nice but took much too long to file that 1/4 inch
of plywood and glue down. It'll take forever to trim these ribs down if I have many areas with overhanging gussets. "Need to get something that will take off larger amounts of
wood that I could easily control." hmmmmmmmmm..... a RASP ! Yes ! I just bought a small one about a month ago from Lowes. You don't want to have one with too large of teeth on it
and this smaller one was what I needed.
I've been working on trimming down the gussets for about 3 hours now. I'm close to half way through them. Like I said before, I'd rather spend a little bit of extra time trimming them
in a controlled manner than to let a 3000 rpm router rip through a few of them only adding more work to my rib making.


 I've started trimming the overhanging gussets and excess glue off of the ribs. I was at first going to make a jig that I could place each of the ribs
into and then route them to size/shape. After thinking about that for awhile, all of about 2 minutes, I just couldn't put a router with a blade moving at
upwards of 3000 rpm against these ribs that I've been working so long and hard on. One slip and there goes all that work. I'd rather spend a few hours
hand trimming them using a few different kinds of files. It's actually going along a lot faster than I thought it would.
I've started trimming the overhanging gussets and excess glue off of the ribs. I was at first going to make a jig that I could place each of the ribs
into and then route them to size/shape. After thinking about that for awhile, all of about 2 minutes, I just couldn't put a router with a blade moving at
upwards of 3000 rpm against these ribs that I've been working so long and hard on. One slip and there goes all that work. I'd rather spend a few hours
hand trimming them using a few different kinds of files. It's actually going along a lot faster than I thought it would.