Mantua, New Jersey
Original Site:
September 2004
E-mail: usav8or@yahoo.com
Aircraft Welding 101.2:
September 11, 2007 A weld is a weld... is
a weld
Back at it.... again, and man is it feeling good.
I head out to the workshop and I know what I'm doing. I
know what to look for. I know why I begin to screw up a
weld and why I'm making silky-smooth welds. (well, not silky-smooth,
but... ya know what I mean.)
I've got more than the basics down and I apply it each time
I pick up the torch. I still go back to what I've written
or pick up the book or drop in the DVD to review. Catch
something I didn't pick up the first time or two. Always
learning.
Tonight I nailed that flame down... didn't have to adjust
it but once. No Popping going on at all. The puddle
formed up and started flowing. It kinda ate away at the
tip of my weld rod..... pushing itself along. I didn't
make it easy on myself either. I laid up some of the tubing
so that it was difficult to reach... at odd angles... just
a part of the learning. An hour went by before I knew it.
A few more practice sessions and I'll try making a set of
rudder pedals. Make them up nice.....
September 13, 2007 Just can't seem to get
out of the heat...
Back out there again. Planned on an hour, stayed for over
an hour and a half.
Again, it's all about practice. The more you practice the
better you get. The welds I was happy with a few months
ago just don't get it anymore. If I make a weld like I did
back when, I'm disappointed in what I just did.
As of today... I haven't taken my welding to be viewed/critiqued
by anyone. I've just been comparing my welding to what I've
seen in books and in the DVD I have. I'll have to remember
to bring a few samples with me the next time I go to an
EAA Chapter meeting. Take it to one of the experts. I've
been meaning to do that for some time now.
I just recently cut in half one of my practice welds. The
tubing and the weld looks as if they're one. Put a smile
on this boy's face. Time to fine tune my practicing. Not
just a nice weld line... I've got to get that signature
"necklace"... the ringlets, a nice throat on the line. More
Practice... Just a matter of spending more time in the
heat of the torch.
September 20, 2007 Turning up the volume...
Played a little with the torch setting tonight. Went into
"unknown" territory. Set the flame of the torch a little
longer, a little hotter. Got the puddle moving real fast.
Not that much popping either. As would be expected, it wanted
to chew through that thin-walled 4130 like it was butter.
Based on a little over an hour of playing with that, turning
up the heat produced flat welds with raised ringlets. Not
what I would call acceptable for aircraft standards. The
raised ringlets were produced by the force of the gases
pushing out the end of the torch, lifting up the liquid
metal like a wave.
I was at first disappointed in my welding tonight, but I
realized I had changed it up a bit. No reason in feeling
bad about that. A lesson learn... and that's what this is
all about. Turn up the volume, turn down the volume, small
rod, large rod, 10 pounds of pressure, five pounds of pressure.
It's amazing what a little twist here or there will do to
the puddle, aka good weld/bad weld.
September 24, 2007 Three's a charm...
Yeah.... back out practicing welding again tonight. Thought
I'd get a 1/2 hour before I did a little bit of CAD work.
The 1/2 hour turned into an hour. as usual.
I think I've figured out what Manuel Benito, one of the
guys on the biplane forum, was saying when he mentioned
how he adjusted his torch flame.
Turn on and light the acetelane and adjust it to just where
it's starting to get rough when you turn up the volumn of
gas. Adjust your oxygen for that perfect flame tip. Waalaah
! Seems to be the length that I've been happy with when
welding, only in the past it's taken me some time to find
that adjustment by just playing with the torch for awhile
in the begining of the session.
I also came to the realization that it's taking me about
three weld joints to get into that "groove" where all the
planets align and all is at peace with my welding. A little
bit more practicing and I should get that down to two than
one. Just need to keep a constant routine of practicing
even if it's just a half hour a night.
What was that, that I was told in the begining.... practice
practice practice. That's what it's all about.
September 27, 2007 the breakthrough...
Back out... you know... back out to the garage workshop,
the place I do all my welding. Wanted to put in at least
a half hour tonight. That practice practice practice I'm
always talking about.
Adjusted the torch to just about perfect from the getgo.
The puddle flowed nice. Dipping in the weld rod, the puddle
just ate it up. Still having an issue I've been dealing
with for most of my time practicing... flat weld lines.
Just couldn't figure out what was up with it. Less heat
and the puddle didn't want to flow... more heat and I was
blowing holes in 4130.
I thought maybe... just maybe, if I use a larger rod, say
a 3/32, it would produce a throat on the weld that would
be that nice mound of rings I was looking for. NOT ! The
only thing that did for me was give me weld lines that didn't
really look like they were attached to the two pieces of
tubing I was suppose to be fusing together. Just looked
like it was sitting on top... doing nothing but adding weight.
Everything I tried doing, didn't work.
Not really sure how I discovered it. Might have been when
I was twisted half-way around my work, half-way upside down...
I dipped the rod in towards the back-side of the puddle
instead of the front like I had been doing (probably by
mistake.) I always thought that the front of the puddle
is where the metal was needed. Tonight, I discovered that
it's not the place that needs the metal... it's the backend
of the puddle that needs that metal.
All these months and I couldn't figure out why dipping the
rod in the front of the puddle made it stick most of the
time. It was because the front end of the puddle is the
coolest part of the puddle, just forming... not as hot as
that "aged" puddle in the back. I was my own worst heat
drain.
My inexperience, and feeding the rod to the front of the
puddle, starved the back-end of the puddle of the metal
that it needed to build up a nice weld bead. Without a source
of metal to feed off of, it took whatever metal it could
get from the back end of the puddle and just sorta mated
the two tubes together the best it could. And the best that
it could do was a flat weld line.
Feeding the back-end of the puddle... Never read this in
any book or saw it on any DVD. Must be something that you
see when you're watching someone right there in front of
you. But hey... you've read it here, you've got a couple
of months of me learning, from the start.
September 30, 2007 good but not pretty...
Got in some welding practice over the weekend... actually
today. whoo hoooo !
Got the lighting of the torch down and now I have the principle
of my welding technique down. Getting consistently good
welds... they just ain't that pretty. More time in the saddle
and I'll start getting better looking welds too.
October 2, 2007 Decided to back off a little
tonight...
Turned back the pressure on both tanks tonight. Erich, from
the biplane forum, had mentioned in an earlier post that
he found 3 - 4 lbs of pressure gave him great control of
the puddle.
Turning
back the pressure slowed down the welding process, but it
allowed me, like Erich, better control of the puddle. Allowed
just as much heat, but the force coming out of the tip was
reduced. It wasn't eating up the tubing as fast as 10 lbs
of pressure, which I had been using.
Took a look at some of my older welds, as compared to tonights...
they're hideous.
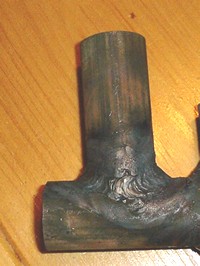
Here's one of my latest creations. Not bad for being self taught. Threw the
photo up on the biplane forum. Scottly took a look at it and said "Although it's hard to tell from a picture, this weld appears to have adequate fill,
adequate penetration, and good technique producing a good bead." He suggested a destruction test of it. I'll be doing that and making a report on it. Randy
wrote, "I think I see two small spots in the center of the weld, top and bottom, that did not get melted into the base metal. Not a structural problem as long as
it did not leave a pinhole. Otherwise, with welds that good I would be welding on the fuselage getting it tacked together. By the time it is tacked you will have
improved another 75% and ready to start finish welding. Remember my first advice when you couldn't decide to weld or not - JUST DO IT.
Thanks for the feedback, guys. I'll soon be tack welding up the fuselage and then on to welding it together. Moving right along...
Click here... for more welding. Pictures of mass destruction.


 Turning
back the pressure slowed down the welding process, but it
allowed me, like Erich, better control of the puddle. Allowed
just as much heat, but the force coming out of the tip was
reduced. It wasn't eating up the tubing as fast as 10 lbs
of pressure, which I had been using.
Turning
back the pressure slowed down the welding process, but it
allowed me, like Erich, better control of the puddle. Allowed
just as much heat, but the force coming out of the tip was
reduced. It wasn't eating up the tubing as fast as 10 lbs
of pressure, which I had been using.