Mantua, New Jersey
Original Site:
September 2004
E-mail: usav8or@yahoo.com
The Empennage... looking to build the tail section..
May 26, 2013 Tail group...
before the turtledeck...
(posted this on the turtledeck page and remembered I had this section started already...)
Another busy day today... but not on the biplane project. Squeezed in a little time so that it wasn't a complete wash of a day.
Needed to measure, cut, and glue on the final former block on the turtledeck floor. This morning I spent close to 20minutes on that task.
I wasn't able to get back on the project until early evening. I need to figure out the tail group; what goes where so that I can position the stringers that begin on the turtledeck and end at the tailpost.
Need to piece the tail area together before I can figure it out...
I made the metal ribs for the tail group back at the same time I made the ribs for the horizontal stabs (which was quite some time ago). The kicker is... I found one of the ribs for the vertical tail and all four for the rudder. Spent way too long of time looking for the second vertical tail metal rib (of which I didn't record the hours).
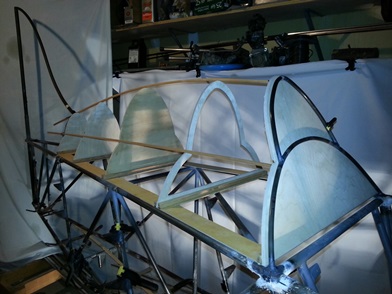
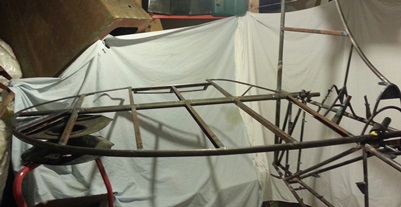
okay... I've found all the ribs I need. Mounted a 7/8inch pole to simulate the vertical tail post and taped the leading edge of the vertical tail into postion. Laid the ribs out per the plans and... stepped back. Looked at it for awhile and decided that I need to modify the area where the forward tail meets the turtledeck (scooch it back a little).
Tomorrow I'll modify the forward bend in the vertical tail leading edge and move forward from there...
May 28, 2013 Took time off to pressure wash the deck...
at least that was the plan...
Worked on the vertical tail this morning (yeah... took the day after Memorial Day off to pressure wash the deck and it's raining).
I ordered the additional ply today, for the turtledeck former I'm re-making, and I need to get the look of the vertical tail nailed down so that I can lay the turtledeck stringers out once the turtledeck is finished.
The first order of the day was to weld on the vertical tail leading edge mounting plate. Had it already cut, with the bottom edge filed and sanded smooth (needs to be since it won't get a weld line. Taped it into position, made a few tacks then finished welded to the rear metal turtledeck former.
Next order or business was... Needed to cut to length then hammer in the top of the 7/8inch vertical post for the vertical tail (duuuuh). Took my measurement from the bottom of the fuselage to a mark 52 1/2inches above it. Make the mark then cut it to length. Hammered it on both sides of the top a few times to bring it into the 5/8inch ID for the vertical tail leading edge (actually hammered it it a little bit more so that I could then reduce the size of the top of the vertical fin's leading edge).
Before making the notch in the vertical tail post I sized up the leading edge to both the vertical tail post and the rear, metal former (the rear of the turtledeck). Marked the forward cut and lopped it off with the metal bandsaw. Put it back into position and made the cut-off mark for the rear end of that same piece (where it would meet up with the forward vertical tail post). Back down to the bandsaw to make that cut.
As I had mentioned earlier... I smashed in, ever so slightly, the top of the leading edge tube (probably from 5/8inch to 1/2inch) so that it would nest nicely in the smashed, ever so slightly, forward vertical tail post. It was then just a matter of grinding, fitting, griding, fitting... grinding... fitting... grinding... until the leading edge tube fit nice and snug nested in the vertical tail post.
Spent close to two hours on it so far and here is what I have:
Spent another 1.1hours on the project.
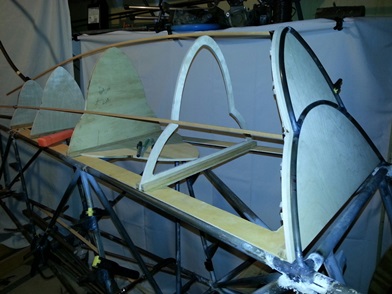
The ply will be here on Thursday to re-make the one former. Had time to figure out the shape of it and adjust the test former that I previously made. Here's a photo (yeah... what's new, eh?) with the re-shaped former. Now all I need to do is re-shape the one just behind it. I'll do that after I make the final former of the former I just re-shaped. (making any sense?)
Doesn't look much different, eh ?
November 19, 2013 Doing stuff...
while waiting for the re-dos for the re-dones...
I'm on hold while some additional cap strips come in for my re-do's of my re-do's on some of the turtledeck stringers. I've been wanting to get to the horizontal stab attach points so that I can see where the lower stringers will fall in relationship to the horizontal tail and it looks like I got my wish.
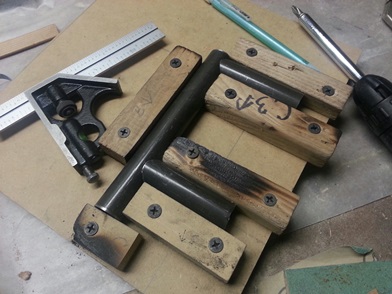
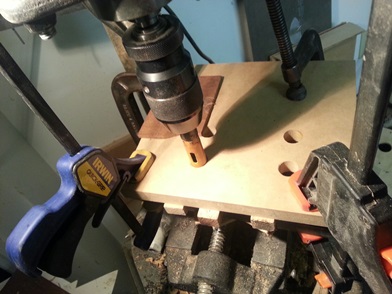
I have all the tubing to make the forward and rear horizontal stab supports (more than I actually realized). Needed to make a jig to hold the tubes in the right place when I go and notch the 3/4inch holes in each of the 1-3/4inch uprights (and these holes will be at 90 degree angles to each other).
Found the 3/4inch MDF I needed to make the jig. Made my measurements and marks then drill the four 3/4inch holes. Needed to find a few pieces of 3/4inch tube so that I could screw in my wood pieces for aligning the tubes. Didn't do much looking to find two pieces, WHICH turns out to be the forward and rear horizontal stab supports with the two bushings I needed for the forward one. I thought I had these already made and couldn't find them (I usually mark the items off with a hightlighter on my plans and these weren't marked...). Glad I found them... it'll save me some time.
Anywho...
the jig is ready to do its thing which will be tomorrow (I think.) Once I've notched the tubes I'll be tacking and then welding them onto the fuselage. And... I just might put those horizontal stabs on to see what they look like (maybe.)
November 29, 2013 Getting things ready...
is three quarters of my time... today.
hmmm... ??? not sure what happened to the last 10 days... but they seemed to have gotten away from me. Some heavy cleaning and Thanksgiving happened... not sure what else ???
Okay, back at it... figuring out how to jig the tubes in the jig to keep them from rockin' and rollin' so that I could get four nice 3/4inch notches in them. Took 2point5 hours but they're done... pretty damn close to real nice. Now to weld them onto the fuselage.
Most of the work is figuring out and then getting things ready for the actual work. Spent less than 1/2hour of actual work on the project...
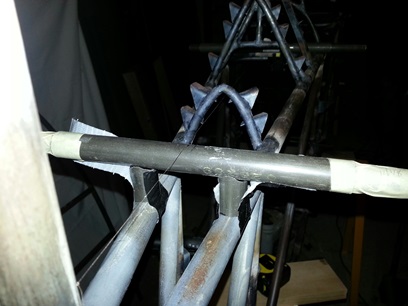
Note: This is just a jig, not the actual layout. Upper tube is off center for jigging purposes.
December 3 n' 4 n' 5, 2013 Staying un-organized...
the hazards of working on your biplane...
little work space, BIG on patience !!!
I love working on the biplane... that Zen-like mindfulness that I like to experience. It doesn't matter if I'm making something for the first time or if it's one of my "search for Excellence" moments... in making something for the 5th, 6th or 12th time. Really... it's all good. Probably helps me in dealing with schtuff that happens during the normal course of 24 hours.
eating the hours aways...
I get to working on the biplane and if I'm working on a particular part for any length of time I'll leave those part-specific tools right there. And then... I get to working on another part while waiting on something and tools begin to get scattered around. I need to bite the bullet and set aside a few hours to start going through my stuff to throw out and organize... keep things together. It'll save me a load of hours in the long run (seems like I'm doing this once or twice a year).
If this is the hazard of working on the biplane... I'd rather be un-organized !!!
over the past few days...
Spent some time figuring out what the plans were trying to tell me about the bushing that adjusts the leading edge on the horz stabs. As always when having a question... I spend a load of time trying to figure it out myself and when that fails, or when I don't think I've arrived at the correct answer, I throw it out to the biplane forum. Within an hour or two, of throwing it out to the forum, I had my answer from Ward. Seems I forgot to look in the Skybolt manual for the answer...
the front horizontal stab spar connection...
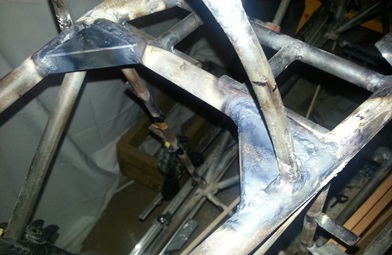
In addition to the 1-3/4inch x 3/8 x .o65 tubes that get welded into the front stab connection, I/you need to weld the same tube onto the fuselage. There's a modification that the Skybolt manual suggests that will work out a lot better than welding the 3/8inch tube directly to the cross tube. It's a piece of 3/4inch x 1-3/4inch x .o49 tubing cut into a triangle and welded just behind the cross tube that you would normally weld the 3/8inch x .o65 tube too. I'll post a few images to show you what I'm talking about.
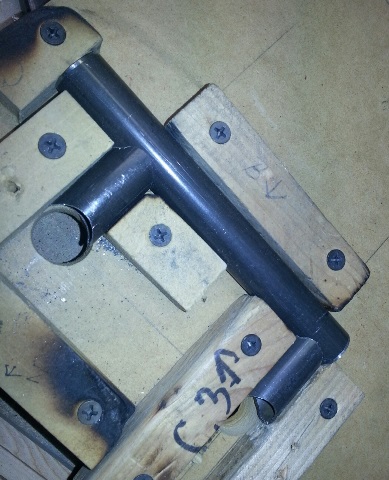
Cutting the supports.
December 11, 2013 Staying focused...
the hazards of not working on your biplane...
Out to the garage I go...
When I lay off for a few days... it's hard to get back into the swing of things. Sorta like exercise...
Had the triangular pieces cut (as can be seen above) for the forward spar attach on the horizontal stabs. This is a modification of the original. The original had the two lower vertical tubes (for the bottom part of the horizontal stab adjustment) welded to the cross-tubes of the frame. This set up will allow me to have a better weld connection by drilling through the triangular gussets and welding the lower portion of the adjustment tube to the gusset. Make sense ???
Tacked and partially welded on the gussets tonight. Will finish tomorrow? or the next day. Still need to clean space out on either side so that I can set up the stabs to find out where I need to tack/weld on the attachments.
December 16, 2013 Robbing Peter...
to pay Paul...
Out to the garage I go... again
To keep moving forward on the horizontal stabs I need to weld the underside of the triangular gussets. If I don't I need to get my ass back on the turtledeck stringer re-dos of the re-dones ('cause the cap strips came in last Friday... FINALLY!!!). I loose forward speed by jumping back-and-forth so I better stay on the horizontal stabs.
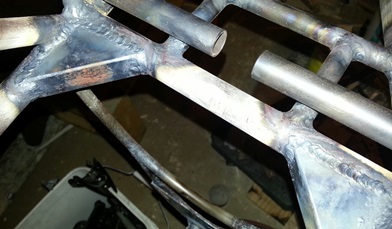
The top sides of the gussets need finish welding... DONE !!!(now) Now, I need to either weld up-side down or take the time to flip the fuselage. For a nice weld FLIP THE FUSELAGE. I won't be happy until they're nice looking.
With the limited amount of space I have, I need to have a pretty good handle on "space management". The ol' "Robbin' Peter to pay Paul." and... to flip the fuselage I take of the stringers that are taped on there temporarily (so I take the extra time to remove all the tape from them so it won't be as hard to clean them up when it's time for fitting them up.) And then all the little blocks of wood I have for shimming when I go to clamp on the stringers for gluing. and... and... and...
With the fuselage flipped and everything shoved in places I've just cleaned off (during part of my bi-yearly clean-up) I sit down to enjoy about an hour of pushing that golden puddle. With it finish welded I'm ready to move on with fitting up the horizontal stabs (with a little bit more space management work before I do).
Looking at a few of the tacked on tubes for some of the other parts I see that I need to pick up a 1/2inch reamer so that I can run a 1/2inch tube inside two tubes to keep them straight when welding each one separatley (in addition to the bottom side welding... you can see the two tubes in the image below).
December 17 and 18, 2013 Still robbing Peter...
Out to the garage I go... again ??? That's a good thing...
Working on cleaning up the garage workshop so that I can flip the fuselage again and have the room to put the horizontal stabs in place so that I can start taking measurements, making marks and tacking on the attachments. Worked on it two days... but the Christmas rush has eaten in to most of the recent days.
I've got the room, now I just need to flip. Andrea will be helping me tonight (Dec. 20th) or tomorrow...
Half the time I'm working on the project is moving schtuff...
January 13, 2014 Search and confirm !!!
Yea... back on it !!! WooHOO !!!
Now to find the plans sheet that I need to confirm what I'm doing with the horizontal stab attachments... FOUND THEM !!! after looking for about an hour. They were out in the garage work area... right where I had left them ohhh sooo many weeks ago.
Had time to cut the length of tube for the rear attach point (thought that had already been cut ???).
That's it !!! (seriously... that's all I did... look for the plans sheet and cut that tube!?!)
January 14 and 16, 2014 Still confirming !!!
Over the past two days... let's just say I got it figured out (not that I had to figure it out... but I'm good with where they go). NOW... I need to tack and weld it on. I'll check the Skybolt Manual to see if there is an easier way of doing it.
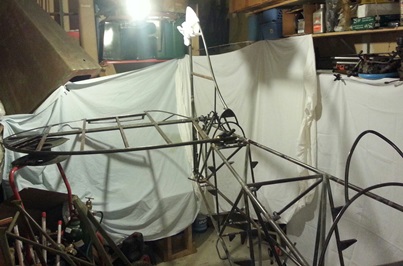
She's looking more and more like a plane...
January 14 and 16, 2014 Still confirming ???!!!
Hesitation never got me anywhere. So... let's call this "being cautious".
I have the rear horizontal stab attachment in place. Took the suggestion from the "Skybolt Manual" and inserted a longer tube inside of the attach tube so that I could measure from the center of the firewall to the ends of the tube to make sure that they are equidistance; square to the firewall. The tape you see in the attached photo is holding the 30" long 5/8inch tube centered in the 3/4inch tube.
As is my usual MO... I'm waiting a day before I tack/weld these in place so that I can double check the measurement.


 Needed to cut to length then hammer in the top of the 7/8inch vertical post for the vertical tail (duuuuh). Took my measurement from the bottom of the fuselage to a mark 52 1/2inches above it. Make the mark then cut it to length. Hammered it on both sides of the top a few times to bring it into the 5/8inch ID for the vertical tail leading edge (actually hammered it it a little bit more so that I could then reduce the size of the top of the vertical fin's leading edge).