Mantua, New Jersey
Original Site:
September 2004
E-mail: usav8or@yahoo.com
January 27, 2009 Smile...
for awhile ?
The amount of heat that you need to throw at these tail feathers is starting to get me a little angry. Just tacking the hinges on to the spars is making
a few smiles. No, I'm not the one smiling... it's what the heat is doing to the tubes that are making THEM smile.
We'll see how it looks after I finish welding up all the welding I need to do to it. One of the guys on the forum said that all you need to do is weld the top and bottom of the ribs. I guess that would be alright but I want to
at least put a good short weld on the vertical side of the ribs. (just thinking out loud here), He's saying, and rightly so, that the heat will deform the spars. My thought... I can always heat the spars so that they bend back into position.
I'll let you know what happens; see if I'm smiling in a few days.
January 29, 2009 No more...
smiles
A fresh look at the elevator/stab that I tack welded up last night... and they don't look bad at all. I might say that they look pretty damn nice, as a matter of fact. So... on to the next set. The "No More Smiles" alludes to the statement I made above.
A little over two hours and the second set of elevator/horizontal stabs have been tacked together. I was going to start finish welding them tonight but decided against it. I want to confer with the Skybolt Manual to make sure that I'm not suppse to be doing something before I finish weld them up.
From what I remember, you're suppose to wait until you mate them to the fuselage before finishing the welds on the hinges. This is so you can tweak them slightly so that they're not binding.
Other than having to shim the leading edge up (.065 to match the thickness of the hinge material) and the trailing edge of the elevator up to center on the elevator spar, there isn't much to tack welding it together. It may be another story when I
need to drill the holes for the tail brace wire bushings, and... But I'll cross that road when I come to it.
I'm finding that you're always prepared for the next step of the build... the previous learning brings you to that point; arriving at the next step ready to take on a new challenge.
May 11, 2009 More work on the tailfeathers...
more learning
Wanted to get the welding on the stabs/elevators out of the way before moving onto the main landing gear. Another item to check off my list of things to do.
Not a lot to write about welding up the stabs and elevators other than one observation that I noticed...
With the thin flatstock of the ribs and the thicker material of the spars, you need to be careful with the torch. Don't want to be burning away all those hours of work that you spent making those ribs. When feeding the weld rod into the puddle, you want to feed it on the side of the thinner material, aka the ribs. This helps keep it from burning away. The rod "runs" down into the right place on the puddle you have going. Just an observation I thought I'd pass on.
OK... you can get back to work now.
One more left to do.
May 13, 2009 Just a little bit more work...
on the tailfeathers
More work on the stab/elevators today. Wished I had a table that was large enough to sit the entire piece on. I'm having to brace this with ends hanging over the sides. First one turned out great... but for some reason (read previous statement), after welding on the 2nd set for awhile, I went to start welding the elevators and discovered that they were off kilter. And it was a little bit more than a little. Not good.
Spent a half hour on grinding off a few welds so that I could re-align the pieces. Nothing hard... just adding more time onto the project. At least I'm cognizant of things as they are happening now... instead of discovering a mistake well past the time of making it. All-in-all a good day. I should be close to finishing the second set of stab/elevators tomorrow. Something else to mark off my list of to-dos.
May 16, 2009 Bending back the tube with heat...
listen to it speak to you.
Finished putting the last line of weld on the stab/elevators today. Not much work in that department. But... even though I kept that second stab/elevator in the jig as long as possible,
welding as much as I could... the damn thing still wanted to twist/bend on me.
How much heat is enough heat to bend it back straight... or when do you even know it's working ?
Again... from observation, you'll remember that the tubing will make a pinging noise when it's shifting around. Actually... I didn't remember this until I heated it enough to start making that sound. When it did, I knew that I was applying enough heat to that tubing to get it to start moving back into position.
May 18, 2009 Locked and loaded...
up the hours.
For whatever reason... I decided to cut and notch the Servo Trim Tabs after welding up the rest of the stab/elevators. Well, I actually know why I did it. (I always have a reason.) I thought that it would be easier to jig it into place once everything had been welded up on the rest of the elevator. You know, lock it into place first.
Listen to me and listen to me good. It isn't.
It wasn't necessarily hard, but it took a lot of time cutting the metal ribs while they were already locked into place and then notching the Trim Servo Tab rib and sliding them into place on a locked-into-position elevator. Do yourself a favor, and if you haven't welded up your stab/elevators yet... fit the Trim Servo Tabs into it now. It will be a lot easier.
Once you've welded the metal ribs into place you're only going to add a load of hours onto the build by trying what I just did. And I've only completed one of the Trim Servo Tabs. And that's not even completely finished. Still need to cut it out of the elevator and then rivet the hinge onto it.
May 19, 2009 Trimming the fat...
off the second one.
As in most cases (except some of those pieces of the Torque Tube Control) the second one that you produce, you'll cut the fat out of it; aka it'll take less time. You've got some of that learning behind you and not as much thought needs to go into making it.
And so it was with the second trim tab. I knew what I needed to do (important note: remember that one of the trim tabs needs to be made up-side down if you're using only one jig.) And yes... I remembered to install the one Trim Servo Tab up-side down. Made sure that I wrote a note and had it sitting on the
work bench in front of me... but I made sure I "remembered."
The second one was a little bit trickier to do than the first. I built the second one up-side down in the jig. And the way that the hinged channels were positioned, I needed to finesse them into place. It was just a matter of cutting the metal rib, that they clamped over, a little differently to allow the upper part of the hinged channel (which in this case was the part that faced down in the jig) to slide over the rib. I should have taken a picture of it... but didn't.
Ok... now it's on to... making the Main Landing Gear ? YIKES !
May 26, 2009 Wait a second...
I still have a few more things to do on these.
These stab/elevators are beginning to copy the traits of the ribs... never ending.
I keep thinking these are finished and I keep having to remind myself that there are a few misc. pieces that still need to be attached. For instance... the covers for the lead weight to blance the elevators and the bushing for attaching the flying wires. The riveting of the Servo Trim Tabs... ahhhh... I'm keeping that as a separate line item.
Tonight I'm working towards getting these bits and pieces out of the way to finally put this puppy to bed. Started the evening making the pattern for the lead weight covers. Picked up a piece of .o40 from the 4130 stack and traced the pattern four times on the piece of flat stock. And... in the middle of all the cutting, had to change the bandsaw blade (those blades I got from MSC weren't/aren't that lasting). Put a 15 degree bends on the open side of all four covers (two bending one way and two bending the other.) Had time before giving Denise a call to weld both the top and the bottom cover on to one elevator. Looks real nice.
Still need to drill the holes for inserting and welding on a few welding rods, which will keep the lead in place once I melt and pour it into the opening. Need to start and finish welding on the covers on the second elevator. And... oh yeah... need to make and install those bushing. THEN I think I can put them to the side until I rivet on the hinges for the Trim Servo Tabs. Better yet, I have the rivets, might as well do that before setting them to the side.
June 3, 2009 Wait a second...
I have other things to make...
more than just the stabilizers and elevators.
I started the Rudder Horn a few days ago... got it to the point of only needing some finish sanding, the ears bent and the holes drilled in it. Last night I decided to finish it so that I could check off another thing from my list. Spent a half hour going nowhere with it. Ruined the end of one of the dead-blow hammers, is about all I did. That .100 material just doesn't want to bend. Throught for a minute and decided that the next one I make I'll leave the ears about 2" longer than needed so that I could use that leverage to hammer those damn ears to a 90 degrees. (Note: The Rudder Horn to the left is the second one I made.)
Today I pulled the sheet of 4130 out, glued the pattern to it, cut it out... took it to the grinder to get it close to the line, then took a few different files to creep up to the line and finished off with sanding the edges up to a 180 grit smoothness.
With it looking all nice and pretty, well the edges did at least, I clamped it in the vice and gave it a few good hits with the dead-blow... it worked like a charm. Leaving that extra length on the ears gave me the material I needed for bending it over to 90 degrees. (would have thought I would have known this by now... having that same issue with the .o60 4130 of the stick boot) Before sanding to a silky smooth finish, I took the torch to it to burn off the paper pattern. Once cooled I sanded the surfaces of all scratches.
Amazing how easy something can be when you do it the right way.


 A fresh look at the elevator/stab that I tack welded up last night... and they don't look bad at all. I might say that they look pretty damn nice, as a matter of fact. So... on to the next set. The "No More Smiles" alludes to the statement I made above.
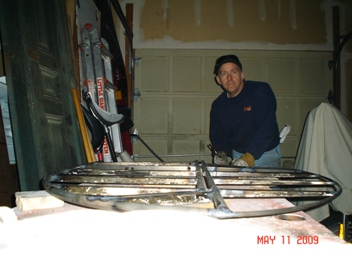
 Finished putting the last line of weld on the stab/elevators today. Not much work in that department. But... even though I kept that second stab/elevator in the jig as long as possible,
welding as much as I could... the damn thing still wanted to twist/bend on me.
Finished putting the last line of weld on the stab/elevators today. Not much work in that department. But... even though I kept that second stab/elevator in the jig as long as possible,
welding as much as I could... the damn thing still wanted to twist/bend on me.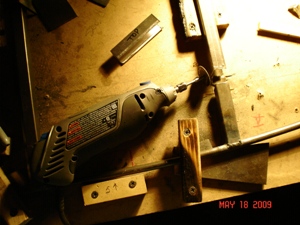 For whatever reason... I decided to cut and notch the Servo Trim Tabs after welding up the rest of the stab/elevators. Well, I actually know why I did it. (I always have a reason.) I thought that it would be easier to jig it into place once everything had been welded up on the rest of the elevator. You know, lock it into place first.
 It wasn't necessarily hard, but it took a lot of time cutting the metal ribs while they were already locked into place and then notching the Trim Servo Tab rib and sliding them into place on a locked-into-position elevator. Do yourself a favor, and if you haven't welded up your stab/elevators yet... fit the Trim Servo Tabs into it now. It will be a lot easier.
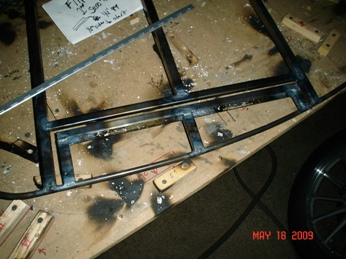 Once you've welded the metal ribs into place you're only going to add a load of hours onto the build by trying what I just did. And I've only completed one of the Trim Servo Tabs. And that's not even completely finished. Still need to cut it out of the elevator and then rivet the hinge onto it.
 And so it was with the second trim tab. I knew what I needed to do (important note: remember that one of the trim tabs needs to be made up-side down if you're using only one jig.) And yes... I remembered to install the one Trim Servo Tab up-side down. Made sure that I wrote a note and had it sitting on the
work bench in front of me... but I made sure I "remembered."
And so it was with the second trim tab. I knew what I needed to do (important note: remember that one of the trim tabs needs to be made up-side down if you're using only one jig.) And yes... I remembered to install the one Trim Servo Tab up-side down. Made sure that I wrote a note and had it sitting on the
work bench in front of me... but I made sure I "remembered." I keep thinking these are finished and I keep having to remind myself that there are a few misc. pieces that still need to be attached. For instance... the covers for the lead weight to blance the elevators and the bushing for attaching the flying wires. The riveting of the Servo Trim Tabs... ahhhh... I'm keeping that as a separate line item.
 Tonight I'm working towards getting these bits and pieces out of the way to finally put this puppy to bed. Started the evening making the pattern for the lead weight covers. Picked up a piece of .o40 from the 4130 stack and traced the pattern four times on the piece of flat stock. And... in the middle of all the cutting, had to change the bandsaw blade (those blades I got from MSC weren't/aren't that lasting). Put a 15 degree bends on the open side of all four covers (two bending one way and two bending the other.) Had time before giving Denise a call to weld both the top and the bottom cover on to one elevator. Looks real nice.
 I started the Rudder Horn a few days ago... got it to the point of only needing some finish sanding, the ears bent and the holes drilled in it. Last night I decided to finish it so that I could check off another thing from my list. Spent a half hour going nowhere with it. Ruined the end of one of the dead-blow hammers, is about all I did. That .100 material just doesn't want to bend. Throught for a minute and decided that the next one I make I'll leave the ears about 2" longer than needed so that I could use that leverage to hammer those damn ears to a 90 degrees. (Note: The Rudder Horn to the left is the second one I made.)
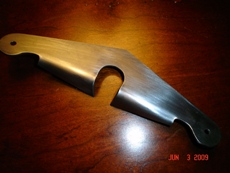 With it looking all nice and pretty, well the edges did at least, I clamped it in the vice and gave it a few good hits with the dead-blow... it worked like a charm. Leaving that extra length on the ears gave me the material I needed for bending it over to 90 degrees. (would have thought I would have known this by now... having that same issue with the .o60 4130 of the stick boot) Before sanding to a silky smooth finish, I took the torch to it to burn off the paper pattern. Once cooled I sanded the surfaces of all scratches.