Mantua, New Jersey
Original Site:
September 2004
E-mail: usav8or@yahoo.com
July 15, 2007 Sand Paper and Grindstones
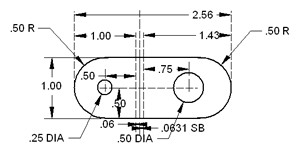
Fired up the bandsaw today and cut the blank for the second fitting I was to cut, SB3PW-006. Same as the first fitting only mirrored.
Not a problem cutting that puppy out. That Boelube works like a champ. Cutting metal isn't like cutting wood... it's a much slower proccess. The bandsaw does one heck of a job with it though.
Not sure if I'd want to be cutting these all out by hand.
Once I've rough cut the blanks out to size it was time trim and sand them to final size and shape. They were within a 1/16th of an inch so I figured I'd take them to the belt sander that I have.
It's a bimetal sand paper that I have on the belt sander so it should make short order of the finishing on the fittings. Make sure that you have all the sawdust cleaned from the sander and
anywhere close 'cause it makes a massive amount of sparks when sanding it down.
OK... so I'm making some progress, but not as fast as I thought that I would. Maybe if I apply a little bit more pressure to the fitting so that the sand paper takes more off at a time..... SNAP ! There goes the sand paper ! DAMN !
Replacing the sand paper on the belt sander and it's just going to happen again... the definition of an idiot there. Think... oh yeah... I have that grinder in the garage... another one of my purchases from about 15 years ago that I've never used.
Not really sure how this is all going to work but at the moment I don't have any other options.
When I said it's never been used... I mean it's never-been-out-of-the-package-never-been-used. Pulled it out of the box, connected all the connections and I was up and running in 15 minutes time. OK... here goes nothing...
slid the edge of the fitting underneath that spinning stone and walah ! sheer beauty... it didn't destroy the edge of the fitting like I thought it would. Like I mentioned before, the process of cutting metal is much slower than that of wood.
Same applies when finishing it too... (insert duh here) even when trimming down the fitting with the more coarse stone it was very manageable.
Once I discovered what I needed to do and how to go about doing it, it was no time before I had the two pieces trimmed down to size ready for the finishing touches of fine sanding. Now if I could only remember where I
put those other two sand paper belts....
July 16, 2007 Bend allowance, set-backs...
Radii and diameters
It all reminds me of school.
I've got some time to spend drawing up fittings. I'm down at the Jersey Shore and my workshop is 72 miles away. No sense in not "working on" the Skybolt. I need to get these fittings drawn up whether I'm home or not. Another one of those neccessary evils in plans-building a biplane... tasks that need to be done but nothing to be shown for it at the end of the work session.
Most of Steen's drawings are drawn showing the bends... make that ALL the drawings are drawn with the bends in them. (nothing against Steen here, all plans come with the finished bracket drawn on the blue prints) In order to make a fitting or bracket you need to have the flat dimensions drawn out. Well... it's not as simple as taking the dimension of each side of the fitting and drawing it out in the flat. Oh no... there's much more to it than that.
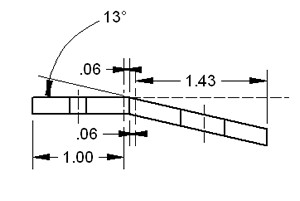
For every bend you have in the fitting there needs to be additonal lengths figured... bend allowance, set-backs, etc. All of these figures change depending on the thickness of the metal, the degree of bend, blah blah blah blah.
It's a lot more complicated than I want to go into here. A
good starting point is Tony Bingellis' book Sport Airplane Construction. I can see where building a plans-built airplane is equivilant to getting a degree in college. A lot of this stuff is stuff I haven't seen for years or I've never seen before.
I spent the better part of six hours today/tonight drawing up four fittings. A lot of angles figured, lengths changed, drawings flipped, radii changed to hole size and vise versa for all the previous mentioned. A lot of numbers being crunched... a lot of learning going on.
I can see my radial-engined Skybolt flying in a few years... it's all good. : )
Click here for a graphic showing set-back and bend allowance.
July 20, 2007 If water heaters had wings...
I'd be flying now.
Home from the Jersey Shore vacation on Thursday. Came back to having to install a water heater. (I knew about it before I left... noithing unexpected.) Anyways... I was going to do the
changeover until I saw/remembered that it was gas. This boy ain't fooling with gas.
Called a plumber to come over on Friday. Later on I spoke to Denise and she knew someone that would come over and do it on the side. (Thank You, Denise !) Early Friday I picked up Ammo (my pup) from his vacation and picked up
the 40 gallon water heater with installation kit. While waiting for the plumber... no sense in just sitting around so I knocked out quite a few more CAD drawings.
Just like learning to weld, bending tubing, making ribs... the more you do it the better you get. After awhile it becomes automatic.
In just under three hours I knocked out six new fittings and made adjustments on another that I needed to re-figure the set-back. I need to sprinkle a few hours of
welding in-between doing all these CAD drawings and cutting out of fittings.
Good thing Denise knew a plumber, or it would've cost me good near a set of spars for either the Upper or Lower Wings.