Mantua, New Jersey
Original Site:
September 2004
E-mail: usav8or@yahoo.com
A list of the "gotcha's"...
that I've discovered for the Radial Skybolt
September 8, 2014 Trying to get things right from the beginning...
This isn't the first time I've discovered, or knew of, something askew with the plans. But... it's the first time that hit me hard enough to want to take pen in hand
and make a list of the various "watchouts" specifically for the "Radial" Skybolt.
The one that started it all...
Stab Wire Attach Straps
Only found out about this by making a post about my tail spring bracket on the biplane forum... I posted a photo of the welded on bracket to the forum and got a response from navybipe about the horizontal welding on the straps (I originally thought he was talking about the welds on the tail spring bracket). So I threw the question out to the group about the straps.
Turns out that the Standard Skybolt has a cross brace at that location along with diagonal/vertical tubes on either side of the cross tube. The front stab wire attach strap is then welded at this location. (I think they do this with other designs as well.)
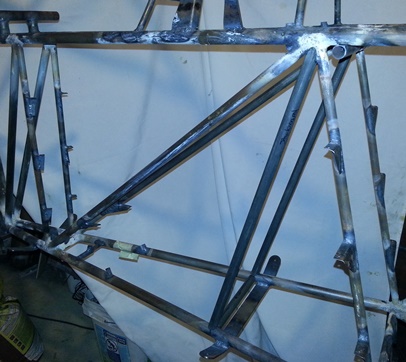
My solution, and I would have done this initially if I had known about it, is to weld a cross tube just in front of where my stab wire attach strap is and then run vertical tubes on both the port and starboard sides from that point up to the tube cluster just above it on the upper longerons. (run on sentence???)
Here's a photo of the Radial Skybolt fuselage as it now stands and a photo of Taff's Standard Skybolt fuselage (at that location).
Taff's Skybolt
My Skybolt
Update: September 9, 2014
Additional tubing cut and in position for welding.
Upper Wing Fuel Tank
JimW, from the biplane forum, discovered this a while back. I'll post it here also.
JimW wrote: There is a dimension error in the plans for the wing tank. If you check the finish dimension for the space the tank fits in, the net opening is 41.75". The wing tank is drawn at 43.5". I suspect when Curtis Pitts was drawing the wing tank he forgot to allow for the width of the adjacent (1 3/8") ribs.
R&D Skybolt Strut Attach Bracket Drawings clarification
( As of today's date) There may be some confusion... If you have the hand drawn plans for the Radial Version of the Skybolt... you will have two different sets of strut attach bracket drawings (at least I did). Nothing on the drawings say that they are for one or another.
One is for the "D" version (why they were sent with the Radial version... I'm not sure) and one is for the "Radial" version. Not sure if someone ordering the "D" supplement gets the ones for the "Radial". From what JimW wrote in his build of the upper wing center section it doesn't look like the "D" plans come with both. He mentioned nothing about this...and he always mentioned when there were gotchas.
Dwg 210 (drawn by C.H.P. dated 3-4-03): These are for the Radial version
Dwg 403 (drawn by C.H.P. dated 9-02); These are for the "D" version
The individual CAD drawings are for the "D" version.
Not to confuse things (and you'd need to be looking at the drawings to understand this)...
- I used Detail A @ Sta 00 (front strut attach) from Dwg 210. Detail A from Dwg 403 could be used.
- I used Detail B @ Sta 24 (rear strut attach/sway wire) from Dwg 210. Dwg 403 (which was designed for the "D" version) has the rear strut attach and sway wire fitting as separate fittings. On the "D" the rear attach fitting goes at Sta 24 and the sway wire fitting goes at Sta 30. There is no Sta 30 on the Radial version.
(I'm not saying to do this but, if I were to do it again I'd readjust the bottom of the rear fitting on Dwg 210 to match the rear attach fitting from Dwg 403 - it's a better match for the tube structure)
A closer look...
at 210 and 420.
Another review of the drawings today. Looked at them for a little over a half hour... confusion at first, then I set myself straight.
As I flipped through the drawings that I have for the "R" version, I saw two pages with very similar fittings. The pages were showing the Strut Attach Fittings, but the drawings on each page were slightly different. After 30 minutes of digging deeper, and cross referencing the Standard fuselage layout and the Radial fuselage layout, I saw that one was showing how the fittings should be made for the Radial version and the other showing how they should be made for the Delta version. (I must have looked at this before and realized it because I made the correct ones. yeah right... )
So... just a heads up; Drawing 210 is for all you building the Radial Version. I'm assuming that the Delta guys are only receiving Drawing 420.
Even though I discovered this back in 2010... when I revisited these brackets (I'm now welding them onto the fuselage) I completely forgot about this and had to re-think it through. It wasn't until just today (9/9/14) that I figured out that I had already figured this out.
More Info...
this time to help build the seats.
Written elsewhere on the site, but I figured I'd place it here too:
For those of you who are building the "R" version of the Skybolt... there are some details left off of the print for the seats. I'm assuming that the depth of them is the same as the Standard Skybolt; 13 7/8". Tubing size is .75 x .o35 4130.
September 28, 2014
I saw this when researching
"how the hell do I contect the sway wires
from the lower front to the upper rear?"
I was just thinking, just before finding this image, that I should have just went and built the Standard Skybolt. Everything has been worked out... all the bugs have been found in the plans, blah blah blah.
I think I know what to do with the front sway wire attach, but I just want to be reassured.
November 30, 2014
keeping paint out of the anchor nuts and bolt holes...
Threw the question out to the guys on the Biplane Forum... Here's what I got.
Insert a screw into the threaded portion of the anchor nut to keep the paing from entering said screw hole. Could use a counter sunk screw or just leave the head away from the anchor nut to make sure the entire thing gets painted.
As for bolt holes. Ream them out after painting the fuselage. I think I'll be greasing them up to keep them from rusting out on me.
oh... One more thing. Put a nylon washer underneath the heads on all screws that contact a painted piece. This will prevent the screw head from tearing the paint as it is torqued.


 Stab Wire Attach Straps

 As I flipped through the drawings that I have for the "R" version, I saw two pages with very similar fittings. The pages were showing the Strut Attach Fittings, but the drawings on each page were slightly different. After 30 minutes of digging deeper, and cross referencing the Standard fuselage layout and the Radial fuselage layout, I saw that one was showing how the fittings should be made for the Radial version and the other showing how they should be made for the Delta version. (I must have looked at this before and realized it because I made the correct ones. yeah right... )