Mantua, New Jersey
Original Site:
September 2004
E-mail: usav8or@yahoo.com
Making the mount...
May 20, 2016 Holding onto that final clue, and...
the search has ended !
I've been hard at searching for the mount fittings that need to be made/bought that get welded onto the fuselage... First contacting Terry from the T-50/UC-78 Club website... with him graciously pointing me in a few directions.
I started talking with a gentleman from MN. He has all 6000 plus blue prints from the original microfilm. He'd look through it and would find what I needed. He confirmed the fitting I needed by sending over a shot of it. GREAT ! That was back in January.
Figured I'd allow a few weeks before contacting him again... Hadn't heard from him and it was about March, so I sent off another email. Never heard back... and I didn't want to be a pain in the ass. You know, 6000 plus drawings to look through and all the rest that is happening in someone's life. I knew it was a lot to ask for. But, that didn't stop me from contacting him again. It was like finding the Holy Grail... I had the final clue and I just needed to pursue it 'till the end.
Sent another email over to him and... he responded. Said that he had switched over from Windows 7 to 10 and it was giving him issues. He'd try again. That night I went onto the 7-50/UC-78 site and searched through an Excel list that he had uploaded to the site; searched for "engine" and found about a dozen "hits". Narrowed those down to six and sent him the information the next day.
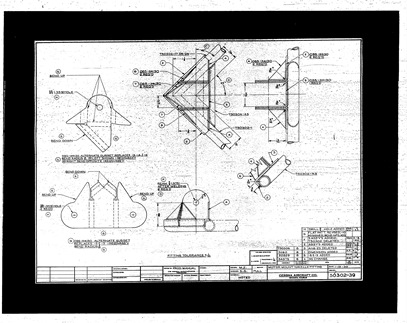
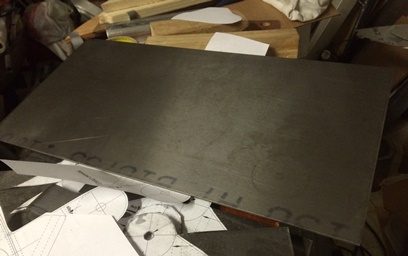
Got an email back the next day... asked if it would be okay if he downloaded all the drawings onto a thumb drive and send it over to me. YES ! Heck YES ! A week later and I have it in my hands. Spent several hours going through the .tif files and low and belhold... there it is; drawing 50302-39 !
And here it is...
Making the mount...
May 21-2-3-4, 2016 The search has ended...
but figuring it all out... just beginning.
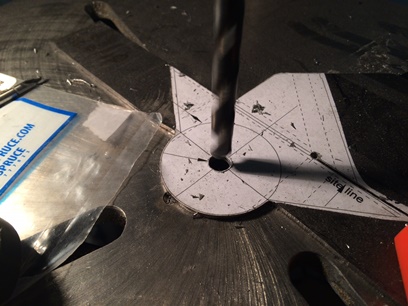
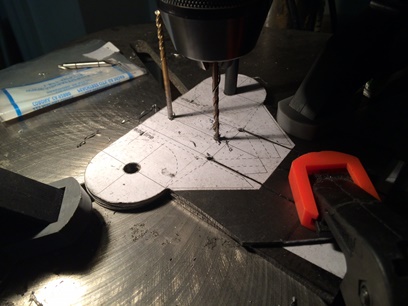
Spent the last few days drawing up in CAD drawing 50302-39. Printed out enough copies of each part of the fitting (3 make 1 fitting - woo hoo) to start the job of cutting all these pieces out of... .100 4130. Got one of them rough cut, parts of it filed down to the correct size. Started thinking about it and thought better that I figured out the bend allowance and set back for the pieces. So... it's on hold for a day or two until I figure out this stuff and then reprint it... or just draw it out on the existing pieces.
It's all loosly drawn up on the "blue prints" and I'm sure it's right... I just want to put that sight line on the pieces so that I can have them bent all the same.
I did print out and shaped up three pieces to figure it all out; how to put the pieces together to make it look like the ones I've seen in photos.
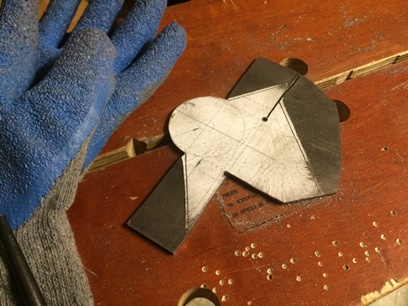
Paper one looked fine... so I glued the first one up and started making my cuts. The excess metal is for banging over the arms of the piece otherwise I'd have some issues with getting nice bends (lessons learned).
Paper printed one.
First piece... before CADing bend allowance.
May 26, 2016 Finally figured out ???
I think so...
I did a little further due diligence... and measured. And... I was a little confused. Shouldn't have been, but I was.
I wanted to believe the sizes I took off the drawings were set in stone. I sized the drawing on the screen based on a 3/8inch measurement. After cutting out the first one I thought better... did the bend allowance and set-back thing. Really wanted to find my site line and in doing so I discovered that the measurements were off a bit.
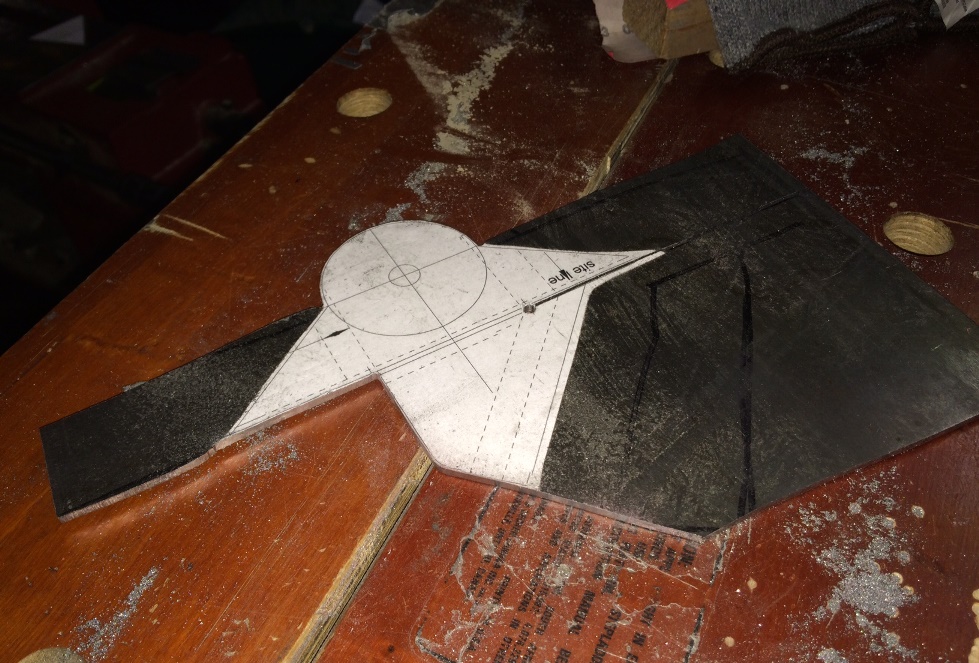
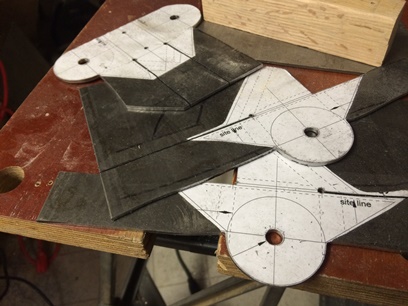
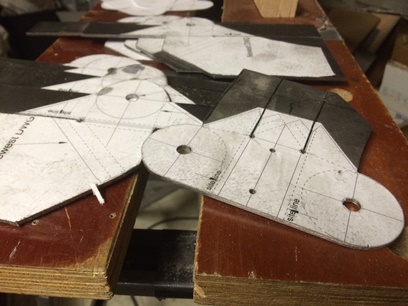
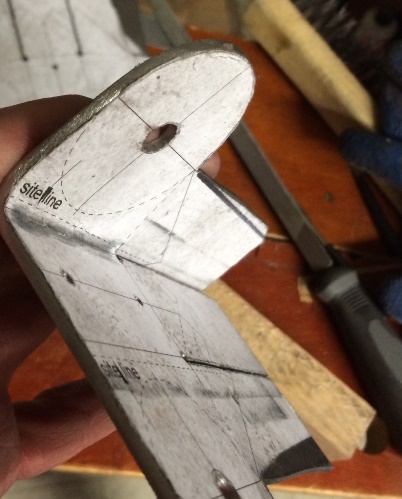
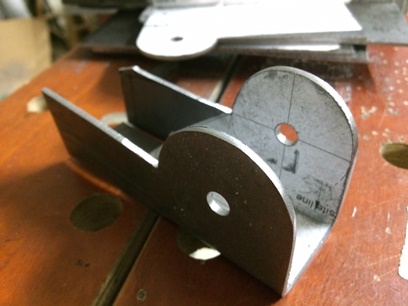
Re-drew the pieces and printed them out again. Tonight... the first one, again. Overhangs are left on for easy bending. Once they're bent, I'll cut to fit/size and then file/sand smooth.
Another first... after CADing bend allowance,
set-back and marking site line.
Eleven more to go... I need to get another metal band-saw blade. This one has seen better days... a few nicks in it and it keeps getting stuck.
May 27, 2016 First fitting...
The real test.
These parts are eating up a lot more of the steel sheet than what their final size is... needing to leave overhang for banging over the arms, etc. If I don, I'll just be re-cutting and bending again.
I'm done cutting to size the three pieces for the first of four fittings. I'm liking the look of them too ! but, DAMN... and I have a long weekend ahead of me with no .100 4130 to work with.
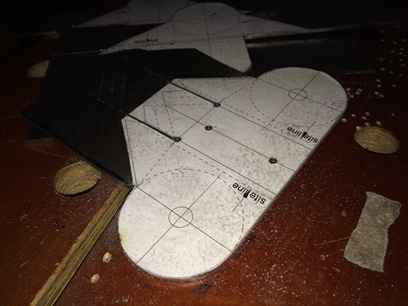
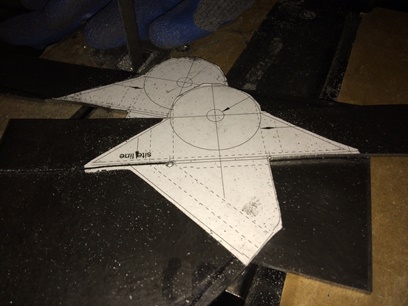
Mirror image of the first...
Center piece.
Now's the time to think this all through. Not that I haven't been all along, but... I need to think how best the steps to first, bend the pieces in a logical order THEN drill through all the pieces... Possibly drill all three pieces then align with bolt then weld together ?
May 28, 2016 First three fittings...
holding off on the test.
It happens every once in awhile... I get antsy... wanting to move forward. Although, I could and it would be okay... holding back until I get some additional material I can then move forward utilizing my time more wisely (aka... I have the first center piece of the three-piece motor mount fitting cut and drilled. I can bend it now or... wait until I get the additional .100 material and match drill the new ones so that the temporary mounting holes all line up with the bending block... making it more of an assembly line process... aka quicker and more alike. Although, these are handmade so that goes only so far.)
I took the time to drill the holes in each of the three pieces for the one fitting. So, now it's just a matter of time before I get the additional metal so that I can make and match-drill and start bending...
May 31 and June 1 and 2, 2016 Thinking and doing...
Mostly thinking.
Ordered the metal during lunch on the 31st... for the rest of the motor mount brackets. Wondering what to do... actually knowing what to do but "how do you do it?". I need to start making the brackets to support the control cables; throttle, carb heat, fuel shut-off, etc.
Out to look at the fuselage... thinking things through. Looking at a few fuselages on the biplane forum. Looking through Tony B's books. Looking for answers to things that need to be make an nothing to tell you how.
Saw a few pictures of what others have done. Kind of got an idea of what to do by looking through Tony B's book; although he mostly talks about a push-pull type of throttle mounted in the instrument panel. Also look on the Pitt's S-1S drawings that I have. None of it really telling you exactly what needs to be done. Threw out the question to the biplane forum. I'm sure I'll get a few response back...
Received the 4130 on Thursday and, after watching the Phillies loose for the seventh in a row, went down and did some work on the biplane... rough cutting two of the three parts for one of the motor mount fittings.
Two more rough-cut.
June 3, 2016 Doing...
Mostly doing.
It's been a long dry spell... but the Phillies finally won ! Well, not a looooong dry spell. They had a seven game losing streak. Didn't surprise me 'cause they had a series against the Cubs who actually lead all of MLB in games by a pretty wide margin, and the Nationals who lead our division. Then... one against the Brewers.
Anyways... that's some good news. As far as on the home front, been plugging away at cutting these pieces out to make the motor mount fittings, which is still good news.
The first time through with cutting these from the 4130 was a little challenging. Now... a piece of cake; I know how to cut each of the pieces without having to worry about the short throat on the bandsaw getting in the way. A little victory, but a victory none the less.
The closer I get to making the motor mounts, and welding them on the plane... the more excited I get about the possibility of working on the sheet metal for the skin, hanging the engine, making and mounting the faceted windshields. nice...
June 4, 2016 The search...
and, yeah, still doing.
More of the same. Happens when you have a multi-piece job, Or... a LARGE job/project to be completed.
In case you're just joining me... I've been working on cutting out the twelve parts that make up the four motor mounts. Took me close to two years to find the plans to make them... now it's taking me quite a bit of time to actually make them.
A part of the fun for me is the quest; finding that one thing you need... and it's not an easy find. Finding drawings for motor mounts, stick grips, how to make the next part...
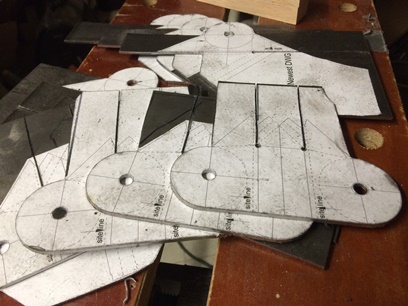
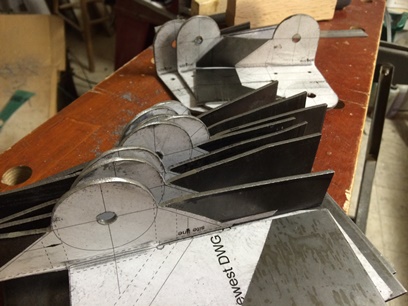
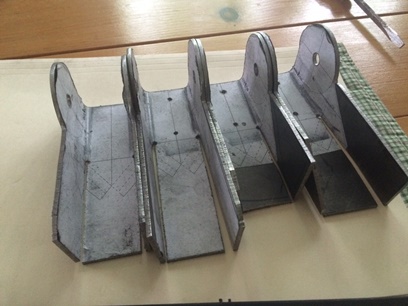
Three or four parts are cut from one 9" x 18" sheet.
I'll need to compare the weight of the sheet to the...
weight of the parts; see how much I'm "throwing away".
Most of the parts cut.
June 5, 2016 Seeing progress...
and, yeah, still doing.
It feels like forever... working on this one project for the biplane. Same thing night after night after night. But, a small discovery... when you've completed a similar task for the entire piece (say... rough-cutting and drilling all of the pieces) you see (maybe the word is acknowledge internally) the forward progress that you are making. Maybe it's a trigger inside of me... needing to see this forward progress.
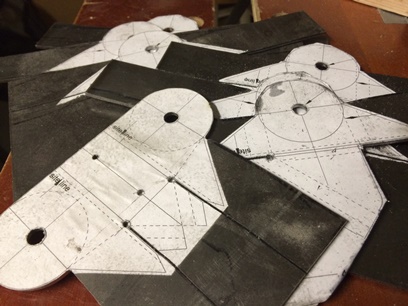
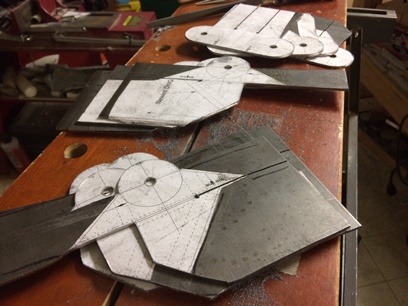
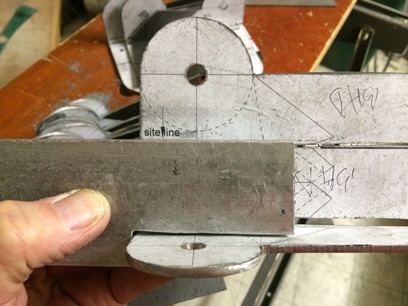
Hey, whatever it is, I'm seeing progress today. All twelve pieces are rough-cut to shape (as much as I can... I've left metal overhanging for easy bending) and drilled. Just need to match drill three of the center parts (screw/bolt holes for mounting to the bending block) and then I can get on with bending these up.
All twelve, main parts for the motor mounts.
June 6, 2016 Riddle me this...
Worked on filing the sides of the parts that I've cut over the past few days in preparation for bending them. Spent a little over an hour and thought I'd call it quits for the night... Went upstairs and took a quick look at the game (Phillies VS Cubs) and saw they were losing 5 to 0. Decided I'd rather spend more time on the plane that to watch them lose. They ended up losing 6 to 4; scored 4 in the bottom of the 9th. ALMOST pulled it off !
Anyways... it gave me more time to work on the biplane project; the motor mounts to be specific. If you look at the picture from yesterday and then the picture below, from tonight, not much of a difference in appearence, eh ? Nothing other than 2hours and a lot of filing (the sides). Tonight's iPod selection, Bruce Springsteen's "The Rising".
June 7 - 9, 2016 The battle of the bends...
Nope, haven't stopped working on it for a second. But... you go through these periods of thinking things through. And that's what I've been doing over the past few days. I keep telling myself that I need to work on something else as I work through these things...
These things, this time, are the bends on the pieces I just cut out; I'm second guessing my figuring out of bend allowance and set-backs AND trying to figure out the best way of wacking them over. I can re-check my calculations but I think I'm gonna need to make a special bending block for the bending. The one I make... that I thought was oh so special is a little too narrow.
Drilling holes to attach to bending block.
June 10, 2016 The battle of the bends... continues
Re-checked my calculations and they are correct; checked the CAD's and checked the pieces. Just a matter of banging them over and seeing if truth is reality. Of which... I still need to do.
June 11, 2016 The battle continues with a beating...
Judgement day... decided that I was going to give it a go, 'cause if I didn't now, when would I ??? Matched the bend to the site line... checked and re-checked then checked again. Clamped it in the vice's jaws like there was no leting it go... and started pounding on it with the dead-blow hammer. It wasn't as bad hammering away on it from what I remember. Maybe it's the larger vice (almost twice the size).
Un-viced it and other than a little overbend, it look pretty good. Took a measurement to the center of the hole and it was just about dead on. Nice. With so much success of the first one... I did the second fitting's first bend. Went through the same procedure then took it out for a looksee. Not so good; looks like I was a little too high with the bend and it missed the relief hole allowing the fitting to crack AND the hole was about 1/16 inch too low. DAMN ! Not one to let it get to me... I tried a third.
Clamped it. Hit it. Repeated hitting. Un-viced and... nice job again. I think that second try I wasn't looking square at the fitting when clamping the bending block to it and it clamped too low on the block. There's multiple bends that I need to make on each piece of the three-piece fittings. Any time along the hitting process I could render it a "test" piece. Hopefully I'll get the knack of bending and not have to worry about it. No sense it worrying anyways...
I was just getting into bending these puppies when I get a text from Bean... he wanted to head over to a new, local brewery in Pitman for a brew or two. Said... what the heck and packed it in for the day and headed over for some fresh local brew. The place is called Kelly Green Brewery, and they're located in the dry town of Pitman, NJ. Something about... well, here's what they wrote on their site: "We are not required to hold a liquor license in order to operate as a brewery. The license we need is called a Limited Brewery License through the NJ Alcohol and Beverage Control." And that is why I can have a brewery just down the road from me. Sweet !
First wack.
June 14, 2016 Strategies of the battle...
Pushing past hesitation... 'cause I'm eventually gonna need to get past it anyways.
Taking my time to properly align the "site line"... all the bends I made tonight were all the same; nice and at the right location. I must have bent 15 bends tonight. Not bad for a nights work, I guess.
Need to re-make the blank for one of the center pieces then bend that and get on with bending the others. I'll need to make some custom bending blocks for a few of the bends, but, eh... it's all a part of it.
I'm glad I read "Understanding Sun Tzu and the Art of War" 'cause I'm going to need to think these sequence of these bends; the plan of attack !
A few bends tonight.
Trim this down for making the second bend.
June 15, 2016 Listening to a Greatest Hits albums...
by the way...
What albums a true true fans buy ?
Tonight I re-made the center piece of one of the three-piece fittings. It was a re-make of the first one I bent that had a leg that was a wee-bit short when I measured it (incorrect sighting of the site line on my part?). Not much to write about. oh yeah... Listened to the first "Eagles Greatest Hits" album. Which... was an album for me, since it was the first time I had listened to the "Eagles". They were a great band.
I don't buy "The Greatest Hits" albums unless they are a band that I hadn't listened to in the past, and it's an artist that I have enjoyed listen on the radio. But I think a true fan of a band, or singer, doesn't own "Greatest Hits" albums. But... like I had mentioned, the "Eagles" being one of my favorite bands, and that being the first album I heard by them... it's an album to me.
Then again... once you're purchased the "Greatest Hits" album you just may like them enough to buy their first release albums. And if you're a REAL fan... you'll make sure you purchase their FIRST album (they've put all their heart and soul into that first one...) Anywho...
June 16, 2016 The only thing to fear...
is not knowing what we are truely fearing ?
Ya know what... I just thought of this: the only fear I have when moving forward is not having enough material to make additional parts if I mess up one or two... I have no fear of spending time on a piece and then making it wrong only having to make it over again; that's part of the learning. Not enough material equals a delay in the build.
I think the battle we have with fear is not really knowing what we are fearing...
Today I continued banging over the second arm of the center pieces. I screwed up one so bad I had to re-make the entire piece. Between running out to the airport to load out the radial and a few other things... I got in a little over four hours today. From start to finish, I cut out seven blanks and scewed up three at some point along the way.